|
|
| |
The Basics |
 |
Let's start where I left off a long time ago: the basic stress - strain curve in a tensile test. Here is the old figure plus the relevant text: |
| |
|
| | |
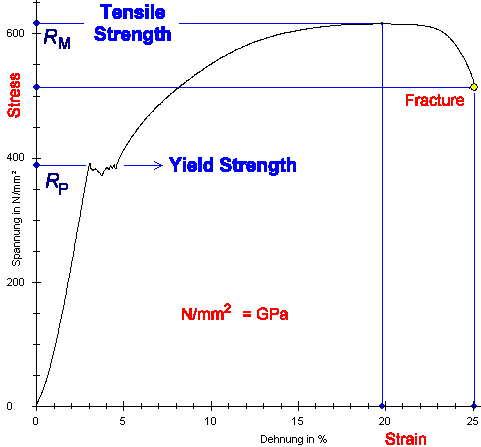 |
| Tensile stress - strain diagram of some steel |
|
| |
| |
|
 |
"The machine indicates the stress and strain values
for the ultimate tensile strength and fracture by blue lines. It can do that because it is smart enough to find the maximum
of a curve and the end of one.
It does not indicate the critical yield strength RP because
it is not smart enough to detect that. In fact, there are special definitions and recipes
to arrive at a number for RP but I will not go into that.
In the curve shown the location of
RP is plain to see but that is not always so. We also see that some strange things go on for a
while after RP was reached. The curve gets kind of wobbly, and much is made of this in real testing.
It is not unusual that the stress - strain curve wiggles a bit or runs through a small peak as soon as plastic deformation
begins at RP. That just signifies that before plastic deformation can proceed in a major way by
dislocation movement, the dislocations either have to be generated
first, or ripped off from the obstacles that pinned them down, or both. That happens at somewhat different stresses in different
parts of the sample, and that's why the curve might become "noisy". It's an important phenomena and a nuisance.
Since at this point we do not yet know what dislocations are, I will get back to this point much later" |
 |
Now it is much later. What, exactly, is going on in the wiggly part (also known
as yield point elongation) of the stress - strain curve shown above for some
steel?
The answer is: the basics are clear, the details get messy. |
|
 |
The first thing to note is that we have two independent
but nonetheless often interconnected mechanisms at work here.
- The stress required to "make" dislocations is typically higher than the stress required to move them.
- A dislocation in a "dirty" material might be surrounded by a "cloud" of dirt atoms. That means that
the concentration of dirt atoms is larger in the vicinity of the dislocation line than in in the bulk of the material. That
makes dislocation movement in the cloud more difficult in comparison to moving a dislocation in regular parts of a crystal.
|
 |
To see what the first effect can do, we only need to perform
a tensile test with a material that contains no dislocations (or other defects) whatsoever.
Such a material exists; it's called a "dislocation free single
crystal of silicon" (Si), the basic stuff for making microelectronic components. And no, silicon is not
brittle - provided you heat it to temperatures above about 700 oC (1292 oF). The figure below shows
schematically but close to reality what you will get; I have used a similar
figure before: |
| |
| |
| |
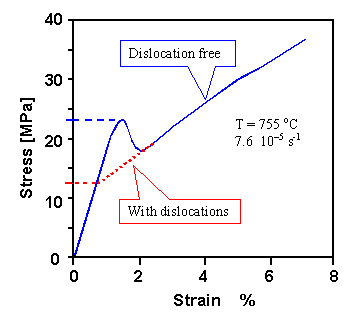 |
| Plastic deformation of silicon |
| Source: Based on the data in: A. Fisher et al.: "Upper yield point of large diameter
silicon", Microelectronic Eng., 56 (2001) 117. | |
| |
| |
| |
 |
Obviously and understandably you need far more stress to start plastic deformation if there
are no dislocations. You first have to make some, then they need to multiply.
Only if there are enough dislocations around, their movement and not their density will control how much stress you need
to produce the required deformation.
The blue line denotes the "upper yield strength" which we can take to be a measure for the stress needed to produce and multiply dislocations. |
|
 |
Now you repeat the experiment with silicon that contains a sizeable density of dislocations
- you might just take the strained specimen from your first experiment. What you will get now is the red
curve - and a lower yield strength that only measures what it takes to move dislocations.
|
 |
In the curves up there I have indicated the yield strength by just drawing in
some lines "by eye". That is often good enough. However, stress-strain curves without clear switch-over from elastic
to plastic deformation do not show an easily seen yield point. Precision-minded engineers therefore came up with a special definition of how to determine yield strength: |
| |
| |
| |
Yield strength or proof stress is the stress needed for a permanent strain
of 0.2 % (sometimes 0.1 %)
| |
| | |
|
| |
 |
It is often indicated in the notation. For example, Rp0.2 = 100 MPa
means that we are dealing with a proof stress of 100 MPa to achieve a 0,2 % permanent deformation .
That answer the
first point left open above. The proof stress is by necessity a bit larger than the stress
needed to move dislocations, but in contrast to the "true" yield strength it is easy to measure. |
 |
So far, so easy. Now it get's a bit more confusing: You can get a similar effect
- a peak in the stress-strain curve around the yield strength - in materials where you already have a lot of dislocations
loitering around, waiting for action. If they happen to be tied down by a cloud of solute atoms, it will it take some extra
force or stress to get them out of what we now will call a "Cotrell
- Bilby
cloud". As soon as they have managed to escape, they need less stress to
move about rather quickly and the solute atoms can not keep pace. Moreover, the applied stress can now decrease without
compromising the deformation.
It's a bit like a rock star surrounded by groupies. Most of them are not permanently
attached at the closest possible distance but swarm around in the neighbourhood. They certainly impede his movement. Only
if he can move faster than they can (he has a Ferrari, after all), he can get away and move around easily again. |
|
 |
It is clear that dislocation imprisonment in a Cotrell-Bilby cloud cannot happen in a clean
crystal. You need some sluts dirt that can form a cloud around a dislocation. Not just any dirt but "groupie"
atoms that are: - Atomically dissolved.
- Happier in the vicinity of a dislocation than in the bulk of the crystal.
- Able to impede dislocation movement. That means they should be good solution
strengtheners.
- Able to diffuse to the dislocations at low temperatures.
The first and second condition is met by many impurity atoms. The third condition actually automatically ensures that
the second condition is met as well. If single impurity atoms impede dislocation movement, they do so because they interact
strongly with the strain field of the dislocations, and that is just another way of saying that they gain energy by being
close to the dislocation line. The fourth condition removes slow diffusors, and that means pretty much all substitutional
impurity atoms in iron. At high temperatures, when they are mobile, they can make it to a dislocation but won't stay there
very long because the large thermal energy kicks them around vigorously. Only impurity atoms that still can migrate some
distance at low temperatures, when they will not get re-emmissioned from a dislocation very quickly again, will do the job.
That leaves us essentially with carbon and nitrogen in iron, just look at the relevant diffusion
constants. |
 |
Working with Cotrell cloud effects is going to be a bit tricky. If you cool down
slowly, pretty much all the carbon will be tied up in cementite and not enough is left to form Cotrell clouds. If you cool
down very quickly, some carbon will still be around in supersaturation in the ferrite but may not have had enough time to
make it to the dislocations. If you don't have plain carbon steel but alloyed all kinds of other elements, there might now
be a competition for the carbon between the "carbide forming elements" and the dislocations, and it's not so easy
to predict exactly what will happen. |
|
 |
"And why should we care?", you might ask. Well - for a number of reasons. There
are good reasons why such a thing as "interstitial-free
steel" is important for the car industry - no Cotrell clouds and thus no annoying "Lüders bands",
see below. Contrariwise, the "bake hardening steels",
also quite important for the car industry, rely on the formation of Cotrell-Bilby clouds and thus need to have carbon interstitials
around.
So there are good reason why we should care. |
|
 |
It remains to see how all this ties in with the topic of this module, which was, as you probably
forgot by now, is "Inhomogeneous Deformation". |
| |
| |
| |
Lüders Bands |
 |
When we subject a normal piece of metal to a tensile test, we typically have a
poly crystal containing some alloying elements. Plastic deformation starts as soon as the shear stress on possible dislocation
glide planes exceeds the stress needed for moving
dislocations on those planes. It is important to realize that the highest shear stress in a tensile test always occurs at an angle of 45o to the pulling direction.
The normal stress on the specimen is supplied by the machine and is nominally constant
everywhere in the specimen because its diameter is constant. The shear stress on all planes inclined with the same angle
to the pulling direction is thus the same, and we might expect that yielding, and thus dislocation movement, should start
everywhere at the same time. Well - it doesn't! |
|
 |
First of all, possible glide planes in some grains are closer to the 45o
condition than those in other grains. Dislocations in the favored grains thus start to move before those in other grains
can do so. Moreover, some of the favored grains contain larger densities of dislocations than others and thus deform more easily that others.
|
 |
As you see there are good reason why plastic deformation should not
start everywhere at the same time but just in some special grains.
That's actually what will happen - the only question
is: will you notice it? The answer, as ever so often, is simple: it depends! It depends if you have or do not have a Cotrell-Bilby
cloud around your dislocations. |
|
 |
If you do not have a Cotrell-Bilby cloud, you will not notice. Your specimen deforms homogeneously even so it started inhomogeneously at the
very beginning. It is easy to see why. As soon as the first dislocations move in favored grains, they start to interact,
bump against obstacles like grain boundaries and so on - local work
hardening takes place. That means that the stress supplied by the machine will no longer be sufficient to move the "early"
dislocations, and the machine now must increase the stress ever so slightly to start dislocation movement somewhere else.
And so on. Your stress-strain curve smoothly changes from purely elastic, to dislocations moving in some grains, to dislocations
moving in many grains, to fully plastic deformation with dislocations moving everywhere. |
|
 |
If you do have a Cotrell-Bilby cloud, things are completely different. You will
notice that plastic deformation does not start everywhere at the same time. As the stress goes up, some dislocations in
some favorably oriented grains etc., will rip free of their Cotrell-Bilby cloud prison as soon as the upper
yield strength is reached. After that they are free to move easily and a burst of plastic straining takes place in a more
or less narrow region or band. That means that deformation in the affected parts is now very easy and the machine must quickly
reduce the stress to the lower yield strength because
it must keep the strain
rate constant.
Only after the first bunch of "freed" dislocations gets stuck again, the stress must go
up a little bit again. That frees dislocations in neighboring parts for two reason:
- The stress is larger there because the regions deformed in the first step are a now a little bit reduced in cross-sectional
area and stress is force divided by area.
- The deformation process produced a high density of dislocations.
So a second deformation band develops, mostly right next to the first one. If that happens the stress can go down
again. And so on.
In total, the stress will jitter up and down in a more or less stochastic way around the lower yield
strength - exactly as you see it in the in the figure above. This happens until all parts of the specimen are finally deforming. |
 |
In other words: Deformation at first will be confined to a more or less small
region where conditions are "just right". It will
progress at about 45o to the axis of the specimen. The "just right" conditions are likely to start
at the "fillet" of the specimen (you won't be able to pronounce the more precise German word "Fußausrundungsfläche"
for that), the region where the standardized specimens start to increase
their diameter, because the changing radii of curvature provide for some stress concentration.
All in all, deformation proceeds - schematically - like this: |
| |
|
|
|
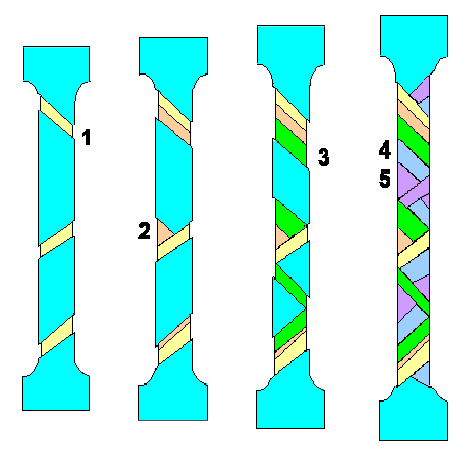 |
| Formation of Lüders bands. | |
| |
|
|
 |
Shown here is a more complex case where the first deformation (No. 1) starts at three places.
Plastic deformation first occurs in more or less narrow regions, roughly under 45o to the acting external stress.
The specimen gets a bit thinner in these regions (exaggerated above), and this is readily observed in-situ by the appearance
of what is called "Lüders bands".
A soon as work hardening in the
Lüders bands demands for more stress, adjacent regions (2 ® 3 ®
4 ® 5) become active for the reasons given above.. The process repeats at stress levels that
fluctuate for while around a constant value until the whole specimen is deforming. After that, the stress-strain curve will
go up as usual, since there are no more dislocations that can be easily moved after "liberation" from their Cotrell-Bilby clouds.
|
|
 |
Note that Lüders bands are not the same thing as
glide steps observed in single crystals like this old example.
Glide steps result on the surface of a crystal because some dislocation source sends a lot of dislocations down the same
plane, producing a big step at the surface where they all emerge. Of course, what you see when you look at Lüders bands,
are the glide steps at the surface of the last grain. These steps are produced by the
dislocations that took up the deformation that runs across the whole poly crystal from the neighboring grain. So there is
some relation between glide steps and Lüders bands but the reasons for their formation are entirely different. |
 |
Now we understand in principle why we can have inhomogeneous
deformation or, expressed in different words, observe the formation of Lüders bands
in steel.
Of course, Lüders band formation poses a major problem in metallurgy. When you plastically deform a
metal, e.g. to make a fender or some other car body part, by "drawing" a metal sheet into a form, the formerly
smooth surface is now speckled and roughened by Lüders band formation, and that is obviously not good. "Orange peel" skin, dreaded by countless females of a certain age, is also known and dreaded
by mostly male engineers in the steel industry with regard to the appearance of the the precious "skin" of their
drawn parts. So it is the avoidance of Lüders bands that keeps us rather busy. It sure helps to understand the mechanisms!
|
|
 |
Lüders bands have been observed and described rather early, long before Cottrell and
Bilby supplied the explanation for their occurrence in 1950. To be fair, I should say that it was actually G.
Piobert, a French General, who first briefly mentioned in 1842 some markings or patterns that were probably Lüders
bands, and that he observed on metal that was deformed by shooting at it with artillery. But it was W. Lüders who clearly described and illustrated the bands appearing on the surface of
polished metal upon deformation in 1860 (of course only the outward appearance and not the mechanism), and that's why we
call them Lüders bands. Don't feel sorry for the French guy for loosing out in naming the effect. He had, after all,
far more fun in doing the experiments. |
| | |
|
| |
Strain Ageing |
 |
Cotrell-Bilby clouds do not only produce Lüders bands, they are also responsible
for an effect called strain-aging. Imagine a deformation experiment where you have deformed
your specimen to some extent. Release the load for a short time, and then continue. Normally, the stress-strain curve will
continue just as it would have if you wouldn't have taken a break. |
|
 |
However, if your material is given to strain-aging, and your break was sufficiently
long, the material might now be harder and less ductile. This is schematically shown below in a figure taken right from
one we had before. |
| |
| |
| |
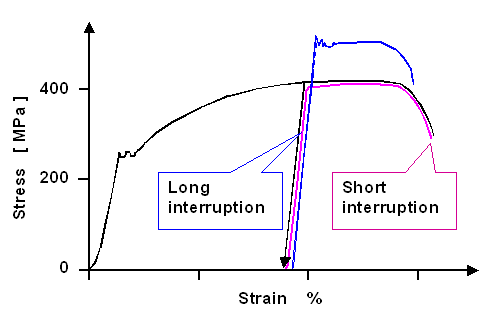 |
| Strain ageing in C15 steel | |
| |
| |
|
 |
What happens is clear. When you stop deforming, your dislocations stop moving and just stay
where they are. They will find themselves in a normal part of the crystals that does not contain more than its fair share
of interstitials. When you re-apply the load within a short time, they move exactly as before.
However, if you allow
enough time for the dislocations groupies to catch up with their prey, Cotrell-Bilby clouds will form around the resting
dislocations. It is now more difficult to move again compared to when they stopped moving at the end of the first deformation.
|
 |
And now you have a problem and an opportunity: |
|
 |
First the problem:
The steel sheet you buy for making
your car parts or whatever, often has been plastically deformed before you get it; for example because that gave it the
shape it has. How that sheet is going to deform when you are ready to use it then depends on how much strain-ageing might
have been going on while it was sitting on your "shelf". I actually gave you an example
for that without mentioning the term "strain-ageing" there.
Obviously, that's not good. You must find
ways to get around this problem. Now, if you can avoid interstitials, you will not have all these Lüders band and age-hardening
effect. So go and buy yourself so-called IF steel,
"interstitial-free steel", or some other grades of steel that do not show strain-ageing effects. |
|
 |
Now for the opportunity:
If you know exactly what
you are doing, you buy an optimized steel for what you have in mind. You first deform your relatively soft steel into the
shape you want, and then you allow strain-ageing to happen, making it considerably harder after you shaped it. Of course,
you can speed up the process of Cotrell-Bilby cloud formation by increasing the temperature somewhat. If you are smart,
you use a heating process for that you need to do anyway for independent reasons - like the curing of the paint you put
on body parts.
Now we are talking BH or bake-hardening
steels. Another kind of steel that makes big inroads into the car industry at present. |
 |
To illustrate these points I give you the typical stress-strain
or deformation curves for three modern steels; all with a nominal yield strength of 350 MPa. |
| |
| |
| |
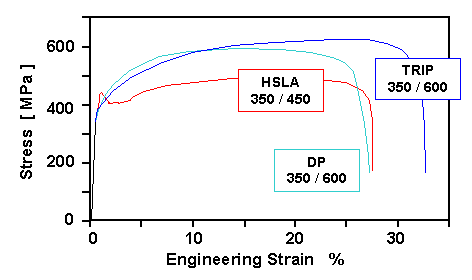 |
Comparison of stress-strain curves for three steels
with the same nominal yield strength | |
| | |
|
|
 |
The not-quite-so-modern high-strength
low-alloy (HSLA) steel does show the typical peak around the yield strength and thus must be expected to incur Lüders
bands and strain-ageing if you're not careful.
The dual phase
(DP) steel and the transformation-induced plasticity
(TRIP) steel do not show this. They are also more ductile and have a higher tensile strength (nominally 600 MPa vs 400 MPa)
than the HSLA steel.
The picture also serves to illustrate two points:
- Property differences that might look rather small to a lay person might be rather decisive for applications.
- Hardness
(about the same thing as yield strength) doesn't tell you all that much. All three steels here have the same hardness!
|
 |
You find more to those steels in the links given above. Here I just wanted to
give you a taste treat for what is going on with the Science and Engineering of steel since about 1980. |
| |
|
| |
Knowing and understanding your steel
becomes ever more important and
allows to engineer new kinds
with amazing properties.
| |
| |
| |
© H. Föll (Iron, Steel and Swords script)


