|
|
| |
Top Down Approach |
 |
Swords are usually polished to a high sheen. Even wootz blades or composition
blades, where you want to see a pattern and not a mirror-like surface, need to be polished
first so the pattern can be revealed in a second step. |
|
 |
Stefan Mäder asserted
in his voluminous and interesting PhD work (I'll get
back to it later) that with respect to polishing nothing can rival the perfection achieved by specialized Japanese craftsmen
using century-old methods for polishing sword blades.
That's baloney, of course. Any standard silicon wafer has been
polished to a perfection far exceeding that of a katana.
|
|
 |
Let's start by considering polishing as a technique that is not only used for sword blades
but for all kinds of materials as part of a production process. Note that I use the
word "polishing" for all methods that flatten a surface including terms like grinding or lapping. To understand
what polishing is all about, I will go through a number of polished products, always asking three questions:
- Why do you polish?
- How do you assess the quality of the polished surface?
- How do you polish?
From the answers it will become clear what "polishing" means. |
 |
1. Example: You polish your pyramid
in order to achieve a pleasant looking smooth surface. Moreover, you may polish some of the building blocks because it is
easier to do precision building with blocks that have "polished" and parallel sides. |
| |
| |
| |
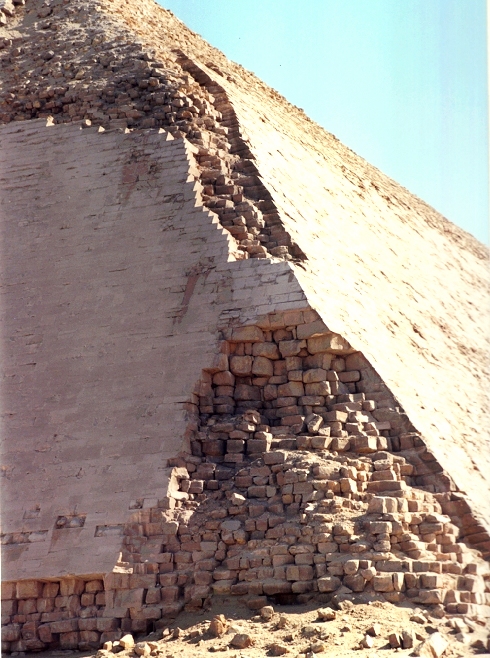 |
The "Bent Pyramid" of Pharaoh Sneferu in Dashoor, Egypt
The only pyramid
with a large part of its coat of polished limestone still in-situ. | |
| |
| |
| |
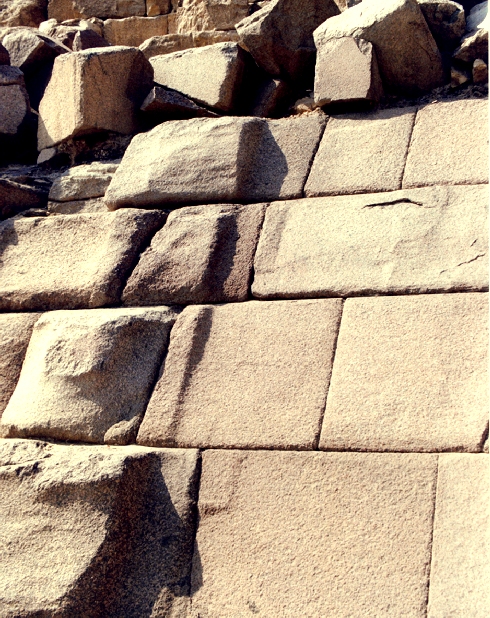 |
Partially polished granite blocks around the entrance to
Menkaure's pyramid at Ghiza, Egypt |
|
| |
| |
| |
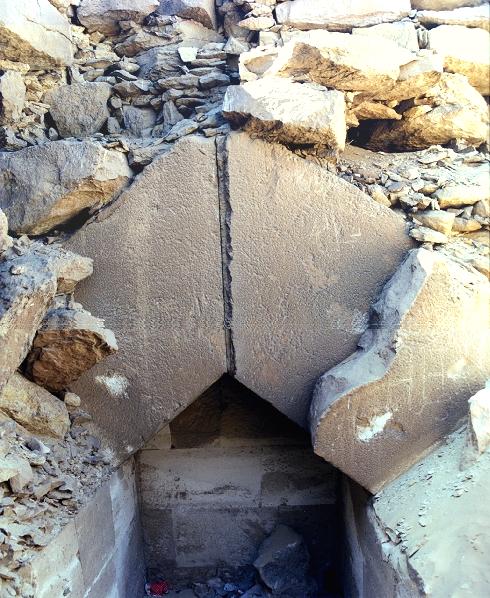 |
Highly polished stones for the masonry of the burial chamber,
while uncut stones were used for the "filling" of the pyramid
Mostly destroyed side pyramid of Pharao Userkaf's pyramid in Sakkara | |
| |
| |
|
 |
So why did ancient Egyptian guys polish those stones about
4.500 years ago (besides that their Pharaoh made them)? Because your pyramid just looked that much cooler 1) with polished sides.
How did they assess the quality
of the polished surface? They looked. In addition, they moved some straight rod across the surface and looked if there were
major deviations.
And we know how it was done: with copper and stone tools and lots of sweat. |
 |
Now you are going to tell me that flattening the sides of humongous pyramid is
not really polishing, it's just flattening the sides of a pyramid. So what is polishing for you? I guess I know. So here is example No. 2 |
 |
Example 2. Let's make a mirror. We need mirrors so the wife can make herself pretty for you.
|
|
 |
In other words: we want to make a device that interacts with visible light
in a defined way. Here are some mirrors with various degrees of perfection: |
| | |
|
|
|
 |
Perfect mirror
Produces perfect image of the wife. |
Distorting mirror
Image is perfect but doesn't look like wife. |
Bad but not distorting mirror
Wife looks right but image is hazy and blurred |
| What is a mirror? | |
| |
| |
|
 |
A perfect mirror does two things:
- It reflects any incoming light ray (purple arrow) to 100 %. Reflection means that
the angle to the "normal" of the mirror surface is the same for the light ray coming "in" and for the
one going "out". The normal is a virtual line at right angle to the surface (black dotted line above).
- The normal is the same everywhere. In other words: the ("polished") surface is flat and not bend or warped
on a scale of centimeters.
We do have mirrors that come close to being perfect. But you never get 100 % reflectivity.
If a mirror reflects 95 % of the incoming light (the rest will be absorbed), it is already pretty good. |
|
 |
Mirrors can be flawed for two reasons:
- The mirror still reflects perfectly at every point but is bend or warped on a large
scale. We call such a thing a distorted mirror, you have probably seen the effects in some amusement park. If the bending
is done in a special way, the mirror might actually show an enlarged image (your razor mirror) or finds uses in telescopes
and other optical instruments.
- The mirror does not reflect the incoming light rays at the proper angle but into a whole range of angles. This is due
to the surface being rough on a small scale. The image then is not distinct but blurred or simply not noticeable.
Of course, you can have combinations of the two basic flaws. |
|
 |
So why do we need mirrors? Well, besides the needs of
the females of the species there are many uses for mirrors in science and technology. I'm sure you can come up with examples
of your own.
How do we assess the quality of a mirror? I've covered that already; see above.
|
| |
How is it done? How do we make a mirror? Now there is
a good a question. There are essentially two ways
- Coat a substrate that has a sufficiently flat surface with a reflecting metal. This is the way most mirrors were made
and are made. Usually we use glass as substrate. The problem now is to produce a good flat glass surface, and then to coat
it. That's not all that easy, but I won't go into that.
- Take a flat piece of metal and polish it. That's how mirrors were made for millennia, and that's what you would do if you want to polish your sword to a mirror sheen. It may
surprise you that there are two quite different ways to do that (I'm big on 1 -2 -3 here!). I will tell you later about
that; in the meantime you can try to figure this out yourself. You could also just read on.
|
 |
What else do we learn from looking at those mirrors? We learn that when you talk
about polishing, you must define the scales you are considering. If the surface of a
pyramid is flat within 15 mm over 150 m = 150.000 mm, it is just as well polished as your sword that is flat within 3 µm
over a distance of 3 cm = 30.000 µm. |
|
 |
So far we went "top down" - from large polished structures to smaller
ones. Now let's go bottom up! |
| |
| |
| |
Bottom Up Approach and "Theory" of Polishing |
 |
As a third example let's look at the ultimate: X-ray
mirrors. There are various kinds of X-ray mirrors; the one I have in mind is a sequence of perfectly flat thin layers
of two different materials. In cross-section it looks like this: |
| | |
|
|
|
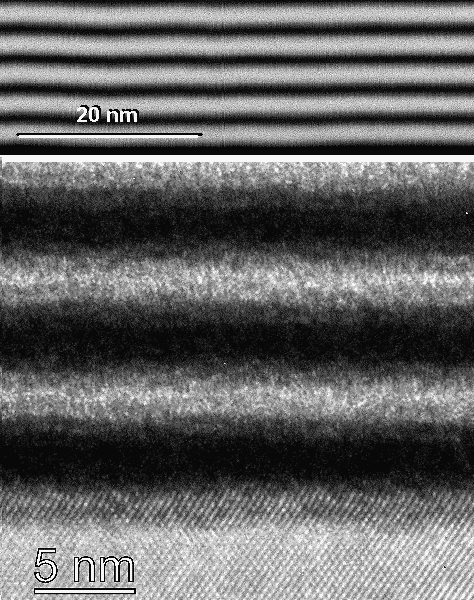 |
| TEM cross-section image of X-ray mirror |
| Source: From my colleague D. Häußler; partially published: HD. Häußler,
U. Roß, B. Ögüt, E. Spiecker, W. Jäger, C. Morawe, F. Hertlein, U. Heidorn, J. Wiesmann; Surface &
Coatings Technology 204 (2010) 1929 | |
| | |
|
|
 |
The alternating layers are tungsten (W; dark) and carbon (C; bright), respectively,
on a silicon (Si) substrate. Look at the scales to get an idea about layer thickness and interface flatness. In the lower
picture you see the "atoms" of the silicon! These
mirrors are good mirrors only if they are as flat as possible. How flat is that? Well - remember our basic view of the universe? All that exists around us (including us) consists of
atoms and photons. Nothing else. The size of an atom gives the smallest possible scale
on which to judge roughness. Taking this into account, it is easy to see where the limits are. |
| |
| |
| |
 |
| The ultimate limit of ideal polishing |
|
| |
| |
|
 |
You have a perfect single crystal with the surface being a major plane of the crystal lattice.
The remaining roughness amplitude then is about half the size of an atom or about 0.1 nm. You can't do better than this
and the X-ray mirror from above comes pretty close. |
|
 |
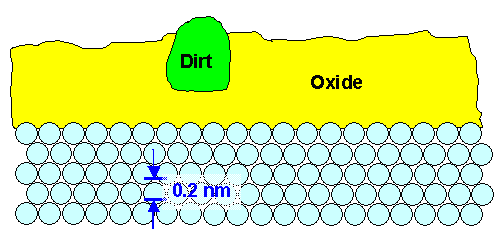
However, in real life there is (almost) no such thing as a crystal surface as shown above.
In real life the crystal shown above would schematically look like this: |
| |
| |
| |
 |
| The ultimate limit of real polishing |
|
| |
| |
| |
 |
The surface is typically oxidized. If that happened in normal (and thus very dirty) air, the
oxide might include tiny "dirt" particles that floated around. The oxide surface might be a bit rougher than the
original surface but doesn't have to be. You may not notice that "native" oxide on many polished products, and
it is typically a good thing to have because it protects the underlying materials. |
|
 |
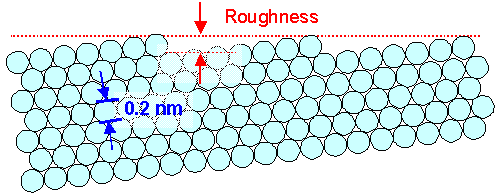
Since we usually do not have single crystals, and since the grains are usually
oriented randomly, we encounter situations like that for the ultimate limit of regular crystalline materials: |
| |
| |
| |
 |
| The ultimate limit of polishing polycrystalline materials |
|
| |
| |
| |
 |
Of course, you would also have to add the oxide-and-dirt layer as above; I was just to lazy to draw that too. |
 |
Now let's look at scales. When you polish
your sword (or pretty much everything else), in order to achieve the effect you are after, you essentially must be aware
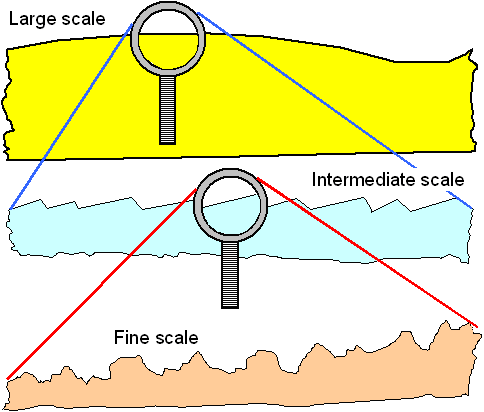
of three scales (here I go again). The figure below illustrates that. |
| |
 |
1. The "large" scale. This is a scale
far larger than what you go for by polishing. It is determined not by your polishing method but by the general shape of
you artifact. In other words: if your sword is bend, no amount of polishing for the mirror sheen will make it straight. |
| |
| |
| |
 |
| The three scales in polishing | |
| |
| |
|
 |
2. The intermediate scale or the important
scale. In the figure I have shown it kind of saw-toothed, indicating that it may have been caused by something like grinding
in one direction. Of course, the valleys and protrusions can have other shapes, too.
This is the scale that determines
how good your polishing is in relation to what you want to achieve. |
|
 |
3. The fine scale. That is the scale that is unimportant
for your needs. You simply won't "see" it.
Of course, if the intermediate scale must already be as small as possible, i.e. on an atomic scale, there is no unimportant smaller scale any more. |
 |
The question now is: What defines the intermediate scale?
The answer is simple: It depends on what you use to "look" at the polished surface. Once more going back to the
basic law of the universe: All you have to "look"
at some surface with are optical photons. I, on the other hand, also have all kinds of other photons (e.g. from X-rays) at my disposal,
plus atoms and their constituents (i.e. elementary particles).
I can hurl whatever I like onto a polished surface to "see" what it is like. A great way of doing that is to use
electrons in a scanning electron microscope, for example. |
|
 |
What I'm going to "see" simply depends on the size of my probe. If I throw atoms
at a surface, the way they will bounce back responds to roughness on an atomic scale. A probe atom hitting one of the ledges
in the figure above will bounce back differently than atoms hitting the flat region. It
"sees" roughness on a scale comparable to its own size. |
|
 |
So what is the size of light? It's given by its wavelength,
of course. That's a quite general truth because everything, including all particles,
can be described as a wave.
|
 |
Light that our eyes can detect has wavelengths from 400 nm - 700 nm or roughly
somewhat less than 1 µm. What follow is |
| |
| |
| |
Polishing to a mirror finish means
having roughness values << 1µm
| |
| |
| |
|
 |
Roughness values of 100 nm or so are "much smaller" (that's what "<<"
means) than 1 µm. In other words: The "fine scale" roughness of your sword blade could still amount to 100
nm between the ups and downs, equal to several hundreds of atoms piled on top of each other - and you wouldn't notice it
by "just looking".
In contrast, "looking" with X-rays (wavelengths around nm) demands that your
surface must be as flat as possible, i.e. atomically flat, if you want it to be a good mirror. Contrarwise, to radio waves
(wavelengths of m) the surface of buildings or the earth in general "looks" highly polished and acts as a good mirror. |
| |
| |
| |
Basic Ways of Polishing |
 |
It remains to look at how polishing is done.
As far as sword blades are concerned, we need to look at the large scale and the intermediate scale. |
|
 |
The meaning of the large scale is clear. The sides of the blade should show no
bending, bulges or waviness other than that intended. If you use it as mirror, it should distort the image only as given
by the intended geometry. Proper "polishing" or better grinding is then achieved
with "grinding wheels". It certainly takes some skill to grind evenly (and to keep your grindstone in good order)
but it is not too difficult.
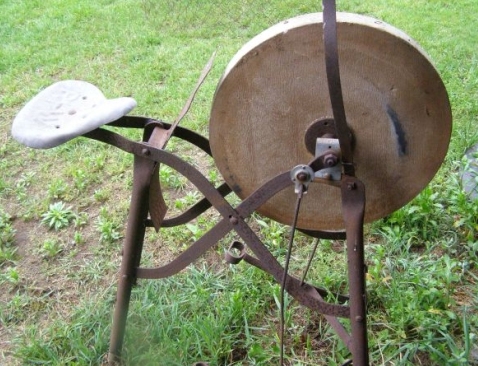
Every smith had a grinding wheel that may have looked like this: |
| |
| |
| |
 |
| Grinding wheel | |
| |
| |
|
 |
The difficult part is too polish to a "bright sheen", or as we know now, to a roughness
well below 1 µm. |
 |
There are two completely different
ways for doing that.
- Polish with a stiff rotating brush or something like that. The bristles of the brush do not need to be hard, in particular
they should not be harder than the material. I call that "brush polishing".
- Polish repeatedly with slurries containing hard particles of ever smaller size. I call that "slurry
polishing".
Both methods yield polished surfaces that look good. But there are major differences. |
|
 |
The first method is quick and easy, the second method is slow, difficult, and problem ridden
- but it is what we need to do in most cases. The polished specimen might look identical
for both methods but if you look a bit more closely (with an electron
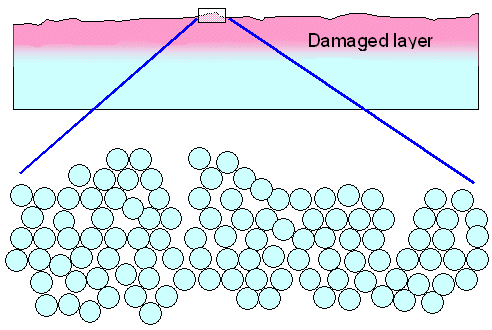
microscope, for example) you see major structural differences. Very schematically, this is what you get with brush polishing |
| |
|
| | |
 |
| Polishing with a "brush" | |
| |
|
|
 |
When you polish with a "brush", you simply deform
the uneven surface by applying high local stress.
You can do this even with a "soft" brush because you apply force to the small
areas of the protruding ridges and peaks of the material that stick out from the bulk if you have a rough surface. Metals
will simply yield and the protruding material
is essentially "smeared around" by plastic deformation.
Microcracks will also develop, and a lot of vacancies will be produced.
You do flatten the surface but at the expense
of creating a heavily damaged surface layer, typically several micrometers thick, and full of dislocations, microcracks,
vacancies and whatever other defects are possible.
Brittle materials are not so easy to "brush polish". If
it works, you are also left with a damaged surface region.
Your coarse light beams (the wavelength would be about 100
times larger then the figure above) will not notice that. The surface is shiny and mirror-like. If that is all you care
for, brush polishing is fine. |
 |
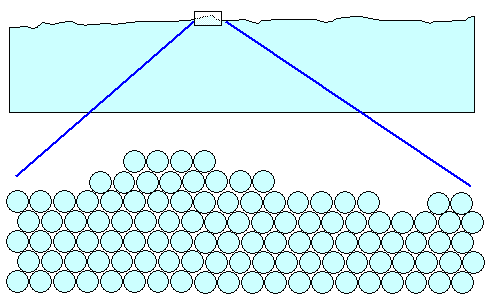
What we frequently need, however, must look like this: |
| |
| |
| |
 |
| Polishing that keeps the crystal intact | |
| |
| |
|
 |
The surface has the same roughness and thus optical appearance as the brush-polished one above,
but the crystal lattice is intact and perfect up to the last atom. I omitted the oxide layer; it doesn't change the essentials. |
 |
Why would we want to go for that, if it doesn't look any different and is so much
more difficult to do? There are a number of reasons: |
|
 |
1. You want to judge the quality of a blade by looking at it. Then you must be able
to see the basic structure and the defects in the blade and not just an irrelevant damaged top layer. That's why Japanese swords had to be slurry polished. Experts then could judge the quality of a blade. |
|
 |
2. You want to reveal the internal structure of a blade, for example a wootz pattern
or the pattern created by forging a composite sword. This is done by "differential etching", by dissolving different
constituents of a blade (harder vs. softer steel, steel vs. cementite, ferrite vs. martensite...) with different rates.
This creates a pattern on the surface that you can see. Traditionally, you use natural liquids like fruit juices, or vinegar
as etchants. This obviously can't work on damaged surfaces. |
|
 |
3. You want to investigate your material (steel or whatever) by defect etching. The same considerations as above apply, just more so because now you look at the specimen with
a microscope. You must polish very well, and you use (dangerous)
"chemical" etchants" rather than fruit juice. |
|
 |
You want to "build" something on top of your polished material. That's one way to
describe all of semiconductor technology
in one sentence. But is also applies to simple innocent techniques like coating some metal galvanically. Your specimen surface
than better is atomically intact as shown above |
 |
It remains to see how slurry polishing is done. |
| |
| |
| |
Slurry Polishing and Chemical-Mechanical Polishing |
 |
A slurry is a mixture of a solid particles and a liquid.
A slurry for polishing should contain hard particles with sizes in a well-defined range,
for example 1 µm ± 0.3 µm. The particles should be harder than the material you need to polish. |
|
 |
The ultimate thus are diamond slurries. For obvious reasons, they usually cover
the small particle size region. Otherwise you may go for silicon carbide (SiC), aluminum oxide or corund
(Al2O3), or silicon dioxide (SiO2), also known as quartz,
or whatever else works for you.
The latter two substances you might find in nature, the others you must make. |
 |
In contrast, a grindstone is a mixture of hard particles embedded in a soft solid matrix. You may find this kind of composite material
in nature (typically some kind of sandstone, containing quartz particles in a clay mineral matrix) or you make it. |
|
 |
Polishing simply means that a hard particle removes some of the material to be polished by
scratching. The trick is to scratch more in places where there are protrusions of the material to be polished. This is done
by pressing a flat surface containing the particles on your specimen. On protrusions you automatically press harder and
thus scratch more.
If you use a grindstone, it is clear how this works. It is also clear that on the large
scale, the quality of your polishing depends on the flatness of your grindstone. |
|
 |
If you use a slurry, you must apply it with some pressure, and for this you need a polishing pad. You can use a handkerchief soaked with slurry wrapped over your finger, or a large round
pad of felt, textile, fur or God knows what, that is glued to a flat round disc that rotates over your specimen.
Using
a slurry instead of a grindstone has a couple of advantages:
- You don't damage the disc, it thus stays as flat as it was in the beginning - in contrast to a grindstone that you wear down.
- The liquid in the slurry acts as an efficient coolant. No sparks fly off, not even tiny ones that you don't even see.
With a grindstone it is far more easy to increase the temperature substantially in some tiny spot, and this will change
the structure. That's one important reason why you should always keep your grindstone wet during polishing!
- The liquid might also do some etching; see below.
- The mixture is always uniform.
- The liquid might prevent immediate chemical reactions of freshly scratched surfaces like oxidation
- The pressure is applied more gently.
- ??? I'm sure I missed something.
Of course, there are problems, too. If for some reasons a few large particles get into your slurry, you can throw
it away because they would produce large and deep scratches. This can't happen with a grindstone; you can always "clean"
it.
Here is a commercial machine for polishing silicon wafers (or anxthing else that fits) |
| |
| |
| |
 |
| A polishing machine for Si wafers | |
| |
| |
|
 |
Note that I haven't said that high-quality polishing is easy or cheap! And quite obviously,
you can't polish a blade in a machine like that. |
 |
As long as humankind had to use natural materials for making grindstones and slurries,
polishing was an art, especially if you went for optical quality. The famous "Thank
You" letter of Theoderic for those cool swords he got from Thrasamond, King of the Vandals, explicitly mentions
the quality of the polishing and the "splendid dust granted to your country by the bounty of nature" needed for that.
|
|
 |
Polishing then consisted of applying grindstones / slurries with ever finer grain size of
the particles in the slurry. As long as polishing was done by scratching, the resulting surface roughness was simply given
by the diameter of the particles you scratched with. For a mirror-like surface you had to go through many stages, the last
on with particle sizes well below 1 µm.
Even today it is not so easy to make particles this small and to keep them
suspended in a liquid. Take the wrong liquid and they clump together, for example. If you had a working system of many grades
of grindstones / slurries, and you knew how to make them, maintain them and apply them, you kept that a closely guarded secret, of course. |
|
 |
When our students need to polish a specimen, they use ready made slurries, polishing pads
optimized for the material, and sophisticated and expensive polishing machines. Nevertheless, they almost automatically
fail to achieve a good polished surface. You simply need to acquire some experience, a "feel" for what you are
doing. If you never have polished before and just follow detailed instruction, your result will be like that sweater you
knitted for the first time by following instructions.
Worse, even if you do everything right, you still end up with
a heavily damaged surface layer. Its thickness is roughly equal to the diameter of the particles you used for scratching.
As far as polishing swords is concerend, this layer is far thinner then the damaged layer obtained by brush polishing and
therfore neither critical for judging sword blades by eye or for "pattern etching".
This damaged layer, however
thin, will not allow semiconductor technology, unfortunately. We need to do better. |
 |
One way is to remove the damaged layer by finding an etchant that dissolves the
damaged material but not the perfect material. After polishing purely mechanically with 0.1 µm sized particles for
example, you only need to remove a damaged layer that's a fraction of a micron thick. That doesn't take long; and you wouldn't
be able to see a difference either. |
|
 |
You can do even better: Remove the damaged layer in-situ
during the polishing procedure. All you need to do is to use some etchant as part of the slurry. A hard particle in the
slurry makes a tiny groove by scratching, the region around the groove is heavily damaged, the etchant in the slurry dissolves
that region - bingo! You have a perfect surface now. |
|
 |
I don't have the faintest idea if the various liquids used for slurries in various
cultures during the last few thousand years actually employed that concept of chemical-mechanical
polishing or CMP. I would be very surprised, however, if some of the old slurries didn't work that way. Of course,
the master polisher had no idea why some slurries worked better than others, he just evolved better and better concotions. |
 |
It is clear by now, I hope, that polishing your sword blade to a bright sheen
is still not all that easy - if you disdain brush polishing. On the other hand, polishing silicon wafers to utter perfection,
coming rather close to the figure above, is a standard process performed several 100.000
times a day. The roughness is less than 1 nm (or three atomic layers), and the flatness (= large scale roughness) is less
than 1 µm - on a scale of 300 mm = 300.000.000 µm! You need to polish your pyramid to almost optical mirror quality
in comparison.
How is it done? By chemical-mechanical polishing. And no, the few companies that can do it, won't tell
you details about the slurries they use, and so on.
Meanwhile (for the last 20 years or so), this kind of precision
polishing has been carried over to polishing some layers deposited on polished silicon wafers, including metals. "CMP",
as it is called by all insiders, is actually a key process in semiconductor technology. |
|
 |
Coming back to the beginning: I'm sure
that the silicon polishing data are a lot better than what the best Japanese polishing masters could do. That doesn't belittle
their achievements, it simply highlights that there is progress in some areas. |
| |
|
© H. Föll (Iron, Steel and Swords script)


