|
7. Rubbing It In |
|
7.1 Phase Diagram and the Structure of Carbon Steel |
|
7.1.1 Experimental Evaluation of Structures and Relation to Phase Diagram
|
|
Looking at Structures |
 |
In the preceding chapters you learned a lot about phase diagrams. No let's apply
that to steel. Let's see what we can learn about the general structure of steel from the phase diagram and from other resources.
How do we assess the structure of steel? Or of any other material? Well, you need to look at it. In chapter
4.1.1 we already looked at steel - with a transmission electron microscope at very high magnifications (> 10.000.000)
and we saw a few of its atoms. They had a size of about 0.2 nm or 200 picometer (pm) and if you like, you can now impress
your girl friend (your wife is probably not any more impressed by anything you do or say) by stating that you, personally,
know about the pico
structure of steel, something way better than just the ubiquitious nano everybody talks about.
But beware! You can't impress me or my buddies. We know
that at very high magnification all crystals look pretty much the same. It's just like looking at, for example, this major piece of art at high magnification. Whatever part you
look at, it looks pretty much like the pictures shown here.
You really miss something by looking too closely!
Same thing for steel. Looking at its atoms is fun when you do it
for the first time but quickly becomes boring. All atoms are rather alike after all; if you have seen one, you have seen
them all. So now we take steels samples and look at their (comparatively coarse) micro
structure with an optical microscope
at magnifications not exceeding 1000-fold. That was the best one could do up to about 1960, and it is still the first thing
you do when you want to find out about the structure of steel. |
|
 |
Anything smaller than about 1 µm (or about 4.000 atoms in a row) is invisible
in an optical microscope. But never fear, enough structural details are visible to make your mind boggle - provided we first
prepare the specimen for the examination. |
|
 |
For that we first polish the specimen to a high
sheen. This can be done in several ways and the results may look the same to the naked eye - but not to the microscope!
You can, for example, achieve a nice shiny surface by just holding your specimen against a rotating brush for a while. Easy
- but useless for structural investigations
Polishing properly for structural investigations is not all that easy.
This is why I decided to give you an extra module for this topic.
After perfect polishing we have a perfectly flat and
structureless surface that just terminates the crystal without producing any damage of its own in surface near layers. You
can now look at it with your optical microscope and what you will see is exactly nothing
. That's the meaning of the word "structureless". |
|
|
|
 |
Now we need to invoke a bit of black art. We concoct a potion, called a defect etchant, that has certain magical
properties. For example, if you drink it during a full moon at midnight in a cemetery, you will be dead. It even works if
there is no full moon, everywhere and at any hour! Defect etchants are typically rather aggressive so don't fool around
with defect etching if you don't know exactly what you are doing.
Let's not drink it but apply it to our polished steel
(after we cleaned the polished surface in more or less tricky ways). If your "etchant
" (for short) for carbon steel was cooked up the right way, and you immerse your polished sample in it, it will now
do the following:
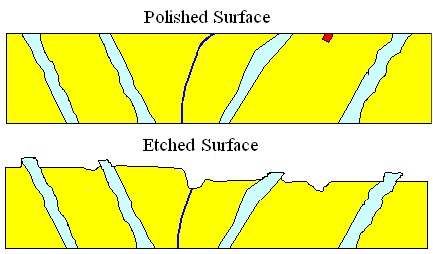
- It dissolves the ferrite (the relatively pure iron)
a little bit, meaning very slowly and with somewhat different rates depending on the crystal orientation of the grains.
- It dissolves the cementite (iron carbide or Fe3C)
precipitates not at all.
- It dissolves the ferrite next to grain boundaries rather quickly.
- It dissolves the ferrite around other defects coming up to the surface rather quickly, too.
|
| |
 |
Schematically, this is what happens |
| |
|
| |
 |
| Defect or structure etching |
| The light blue stuff is cementite, the line symbolizes a grain boundary or dislocation, and the red thing
is some precipitate. |
|
| |
|
|
 |
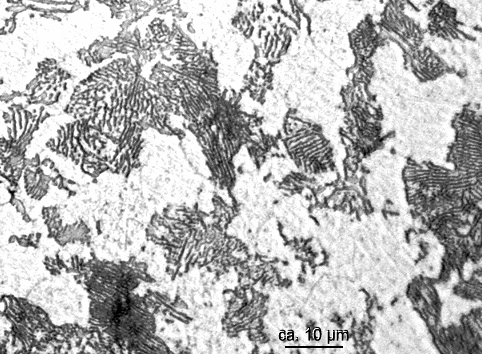
In reality you might see something like this: |
| |
| |
| |
 | | Optical micrograph of etched medium carbon steel |
|
| |
| |
| |
 |
The black stuff is cementite; grain boundaries are not really visible here. The
cementite shows a kind of "zebra" structure (I'll come to that soon). If the lamellae in that structure would
be a little bit smaller, the light microscope couldn't resolve the structure anymore. What you see then looks like this: |
| |
|
| |
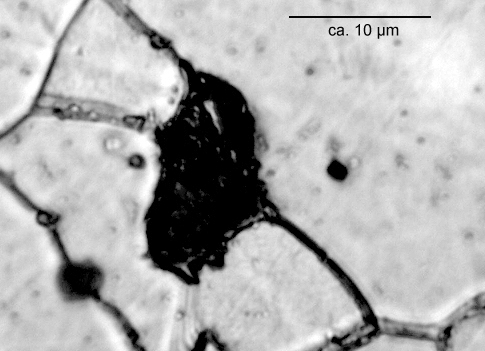
 | | Optical micrograph of etched low carbon steel |
| The black patch is a grain filled with cementite lamellae too small to be resolved. The grain boundaries
are well visible now because the sample was etched much longer.. |
|
| |
| |
|
 |
Nowadays we have scanning
electron microscopes (SEM) that allow to look at surfaces with a resolution far better than that of a light microscope.
They are also far more expensive than a light microscope and it is more time consuming to use one.
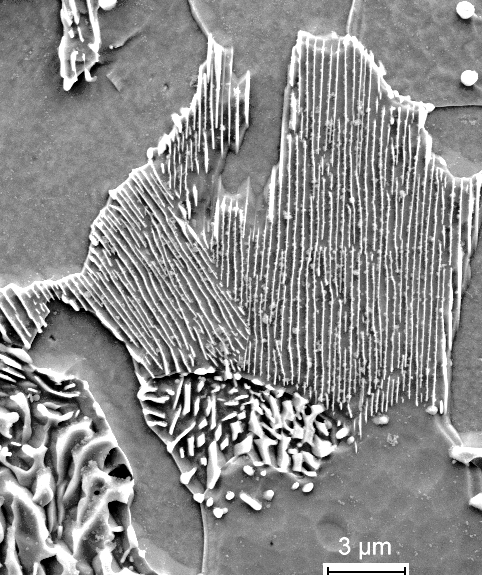
This is what you
might see in a case where you wouldn't see much in a light microscope: |
| | |
|
| |
 |
| SEM micrograph of etched low carbon steel |
| It is clear that the (white) cementite has resisted etching and sticks out. At grain boundaries are steps,
indicating that different crystal orientations etch at different rates. |
|
| |
| |
 |
The two examples already show that structure etching
(also called defect etching) is an extremely powerful technique! Generations of Materials
Scientists (then also called Metallographers
) relied on it and most of our empirical knowledge base about steel and pretty much all other metals, semiconductors
and ceramics comes from structure etching. |
|
 |
However, you only see the structure that the etchant was designed to reveal.
What will happen if you use the etchant that produced the pictures above for "carbon steel" when you use it for
phosphorous steel? Or for stainless steel? Or...? There is
no guarantee that some "carbon steel" etchant works for these materials too.
You get it: there is work to
be done. |
|
 |
Every material requires its own etchant. Since there are no simple guidelines
for concocting these potions, and since tiny details matter a lot, defect etching still counts among the black arts in modern
science. Of course, after long years of applying it to iron and steel, the art of brewing and applying the various concoctions
for steel are now taught in undergraduate classes at Hogwarts and at all Materials Science
and Engineering Institutes. But it is still very advanced magic to come up with a new brew for some new kind material. Take
gallium nitride (GaN) as an example for a material that became very important recently (look it up!). There is not yet a
good defect etchant out there.
The science module gives you details about defect etching of steel. |
|
|
 |
What I just did was to give you an idea that when you stare into your microscope,
most of the difficult work has already been done. Every idiot actor or actress pretending to be a scientist
can stare into a microscope. If there is a decent specimen
under the lens, he or she cannot avoid to see something. But specimen preparation comes first and that requires time and
some skills that are not all that easily acquired. Same thing for the interpretations of what you see. |
 |
In chapter 3 we have
tortured steel and innocent bystanders by pulling them up to the breaking point. Now let's look at what has happened to
the microstructure of the specimens sentenced to a tensile tests. We want to know how the microstructure changes during
the various phases of plastic deformation and fracture. This is going to be real work! |
|
 |
We have specimens from several
types of steel and we need to look at their structure before we did the tensile
test and after we elongated them plastically just a little
bit, a bit more, up to a lot
. We should look at the pieces after they fractured, and on elongated specimens
after we heated them for a while at some temperature, including the process called normalizing, and so on. |
|
 |
Each time we have to cut a sample, grind and polish it, etch it, look at it, take
pictures and discuss them. Not a big deal scientifically - but a lot of work.
You should certainly do that yourself
for a while. It's the only way to get a feeling for what can be done. But when you become a Professor, it is better to train
a lab technician for the job. He (and especially she) will be far better (and cheaper) than you at doing this kind of work.
Going through the program above she will also produce far more pictures than I can include here. It is also not much
fun to go through umpteenth pictures, discussing every one at length. You know this if you have ever been the target of
a slide show by a well meaning relative. |
|
 |
It's also a lot of work to find out what kind of structural changes occur between
high and low temperatures for a given piece of steel from only
evaluating all these pictures. So let's invoke our central science dogma. Since there is nothing more practical than a good theory, let's first look at the phase diagram and see if we can deduce
what we should see. If we can do this with confidence, we don't need to look at too many pictures. Same thing for deformation
experiments. If you know the theory, you only need to analyze a few relevant samples to get you oriented. |
| |
|
|
Predicting Structures |
 |
Below is the relevant part of the iron-carbon phase diagram around
the especially important eutectoid composition. Let's see if we can predict what kind
of structure we will get, taking into account that the crystal will never make it to nirvana proper. Why? Because for nirvana
we know the structure: Just perfect big crystals of whatever phases we need. |
| | |
|
| |
 |
| What happens at the eutectoid composition. |
|
| |
|
 |
First, we look at a steel with the so-called eutectoid composition, meaning the composition at about 0,7 wt % carbon. That's where
the g phase can change
into the mixed a+ cementite phase directly,
without having to go through the a + g or g
+ Fe3C region. This is indicated by the green line.
This is exactly the same thing that we found for the
case of an eutectic composition not so
long ago - except that the phase change here is not from liquid to solid but from solid
to solid. That's why we call it eutectoid instead of eutectic, just as you might
call (insert politician or banker of your choice) humanoid (= similar to humans) instead
of human. While we are at it, here are two more "oids": |
|
 |
Steel with less than 0,7 % carbon we call
hypoeutectoid. Should there be more than 0,7 % carbon,
the steel is hyper eutectoid. |
|
 |
Sorry for throwing Greek at you once more, but in this case it's easy:
"Hypo" means "below" or "under" as in "hypodermic",
under the skin.
"Hyper" means
"above" or "excessive", as in "hyperactive
".
OK - once more so you get it: (">" and "<" mean "larger as" or "smaller
as", respectively): |
|
|
- Hypereutectoid
steel has more carbon than the eutectoid composition; i.e. a carbon concentrations
> 0,7 %
- Hypoeutectoid steel has less
carbon than the eutectoid composition; i.e. carbon
concentrations < 0,7 % |
|
 |
Yes, I could have used everyday words like "proper", "low"
and "high" instead of "eutectoid", "hypoeutectoid" and "hypereutectoid" carbon steels,
respectively. But if you want to be a member of the gang you must learn its slang. |
 |
If we have the eutectoid composition and hold it above
the transition temperature around 1000 K (727 oC, 1341 oF), we will find the g
structure called austenite. At this temperature we also have enough mobile vacancies to allow some motion or diffusion of the atoms. Our steel will then happily work on changing the microstructure
of the austenite to a nirvana structure. It will not succeed in finite times but getting close. |
|
 |
If we allow it some time, we could reasonably expect that its
structure will consist of big grains of the pure g-phase or austenite,
and that it will be rather free of dislocations or other big defects.
I'd love to show you a picture of this serene
state of being, but it's rather hard to look at red-hot things close-up with a microscope. It is actually impossible. We
could get a picture with tricky and expensive equipment involving X-rays and so on, but why should we bother? Why should
we spend a lot of (your) money and (our) time to show that things really are what they simply
must be? Behold the wisdom of the central dogma! |
|
 |
The best I can do is to show you a picture of the austenite structure as we find
it in some alloy steels ("stainless steel" or "austenitic steel" variants) at room temperature. If you add substantial
amounts of alloy elements like nickel (Ni) and chromium (Cr) to the iron-carbon mix, the transition temperature for the austenite ® ferrite + Fe3C phase
transition goes down to values where it cannot take place anymore (too cold to move). Austenite then exists at room temperature
as a metastable phase. We cannot expect it,
however, to be as perfect as the real thing at those low temperatures.
Nevertheless, here goes. The following picture
shows what a rather perfect austenite structure looks like under a light optical microscope at low magnification:
|
| |
|
| |
 |
| Structure of metastable austenite at room temperature. |
| Big grains, a few blackish things (whatever they might be; I don't know either, we haven't been introduced)
and some "grizzle" in the background signifying a bit less than perfect polishing or God knows what. |
|
| |
|
 |
This could be austenitic stainless steel from your kitchen sink. It looks polished
because it is polished and thus would show no structure under the microscope. We know already why we see something here. |
|
 |
Once more we see the structure after
defect etching. As stated above, in order
to render the bigger defects visible, we need to etch our specimen after we polished it to a high sheen. Grain boundaries
then typically produce tiny grooves and steps that appear as the black lines in the optical micrograph above. |
|
 |
Note that I could easily cheat on you. I would never do that, of course, but what
you see above could just as well be a picture of the microstructure of copper (Cu), gold, (Au), aluminum (Al), silicon (Si),...,
whatever. There is no way of telling just by looking at the picture. But you know that Materials Scientists and Engineers
don't cheat people out of their money since you rarely see them driving Lamborghinis or Porsches. So you can trust us in
science matters, too.
If you're now inclined to send me (large) amounts of money, I will happily invest it for you. |
|
 |
So defect etching does help you to see at lot of structure on the surface - but
beware! You will not see everything. With a light optical microscope you cannot see small "nano" things at all,
even it they are properly etched. Then other structures might be there but might not have been revealed by the etchant.
And beware of the bane of all metallographers: artifacts! Things that are not there but nevertheless show up.
Defect etching was and is crucial not only for iron and
steel but also, for example, in silicon technology. The link takes you deep into defect etching in silicon, the probably
most thoroughly investigated material in this respect. | |
|
 |
Be that as it may, what we see in the picture above is pretty much what we would
have expected: We see a nice poly crystal with irregular and rather large grains. Grain sizes around 40 µm - roughly
the thickness of a hair - are considered large
Nothing spectacular otherwise. The
faint structure in the background may have some significance but it also could be an artifact.
Nevertheless, the fact
that we can see a good part of the structure of austenitic fcc steel (or other materials)
after some defect etching is of utmost importance: it started Materials Science! |
|
 |
Before about the middle of the 19th century, working with iron and steel was a
purely empiric enterprise, based on experience and not much else. With the advent of microscopy, the science and technology
of materials like steel started.
Researchers then had only optical microscopes
to look at the microstructures of things (and no quantum theory, statistical thermodynamics and other basic tools).
Electron microscopes hadn't been invented (that had to wait until around 1960), not to mention high-resolution electron
microscopes (HRTEM), that allow to see crystal structures or atom columns directly, which were not available before 1975. |
|
|
|
 |
Come to think of it, even atoms hadn't been "invented"
yet in the 19th century. Ludwig Boltzmann, one of the most
outspoken proponents of "atoms" as something real, was ridiculed as late as the turn of the century (1900) not
only by Wilhelm Ostwald (of "Ostwald
ripening" fame; I'll get to that) and Ernst Mach (of supersonic
velocity fame) but also by no less a celebrity than Max Planck, who opened the door to quantum
theory but had a hard time to believe in the existence of atoms.
It was Albert
Einstein
in 1905 who put an end to that and firmly established atoms as being not only real
physical entities but the only entities that exist besides photons
(which, incidentally, he introduced at the same time). | |
|
| |
|
Now I have a question for you: Did atoms (or about anything else in science)
get "invented" or "discovered
"? Are they just figments of human thinking; social constructs that will be laughed at by scientists in the future,
or are they real entities, existing independent of humans at all times? This link will tell. |
 |
Without knowing about atoms you can't fully understand crystals.
Without crystals you can't have crystal defects. Without crystal
defects you can't describe the microstructure of materials. Not knowing the microstructure of materials prevents you from
understanding
most of their properties.
It doesn't prevent you from describing
them, however. For example, by just doing measurements you can correlate the carbon concentration and hardness and
thus answer the "what" question.
"What is carbon doing in iron"? "It makes it harder"! You can even
do that quantitatively with numbers. What you cannot do is answering the "why" questions. "Why is carbon making steel harder"?
"I don't know"! |
|
 |
So you, the not-so-ancient smith in the 19th century (now called Engineer), will
prepare specimens, etch them somehow, and put them under your microscope. If you do it right you are going to see things.
Even if you don't have the faintest idea what it really is that you see, you can always
describe it in words and
measure parameters like size or distribution. |
|
 |
If you are among the first ones doing this, you are going to see things that nobody
has seen before. If you miss proper words for describing what you see, you just invent some new ones like "pearlite",
"cementite", "martensite" or "bainite" (not to mention "ledeburite"). You still
don't know what it is but now can talk and write about it - it's not unlike politics at this stage. |
 |
In what follows we look at optical "micrographs"
like our early steel scientists and, while we are not going to see atoms, small precipitates,
dislocations and the like, I promise that what we are going to see will be quite enough to make your head spin. In other
words: we are looking at parts of the microstructure of iron / steel. For the rest we
would need to employ electron microscopy or other sophisticated
techniques. |
|
 |
And in contrast to the pioneers of old we now know
what we see! Well - make that: I know what we see, and I will tell you. |
| |
|
© H. Föll (Iron, Steel and Swords script)
