| |
Etching Steel |
| |
General Consideration |
 |
You might have looked at the "Defect
Etching in Silicon" module. If not: now would be a good time to do this. Why? Because etching Si is so much easier
than etching steel!
Let's start here by considering what we would like to see after defect-etching (or just etching
for short) a polished piece of steel, looking at its surface with a light
microscope or, on occasion (budget permitting), with a scanning
electron microscope. |
|
 |
On second thought, let's start by considering what we will not
see: - Everything inside the bulk of the specimen not intersecting the etched surface.
- Everything not in your field of view (typically 99.9999.. % of a sword surface considering that you look at a few 100
µm2 at best for one shot.
- Individual small things with dimensions much smaller than the resolving power of the microscope (at best about 1 µm
for the light microscope).
- Everything not sensitive to the etching medium.
- Individual big things if they are too close together.
- In a light microscope: the chemical nature of whatever since you just can't "see" that.
A sobering list! Nevertheless, looking at an etched surface by some kind of microscopy
is far superior to most other "lookings" where you simply see nothing. The
exception is an element analysis in a scanning electron microscope with EDX (here
is an example). In doing this, however, you miss other things, not to mention that this is rather tricky and costly.
|
| |
If we look at bloomery steel (plain carbon steel with small amounts of dissolved
impurities and some slag / "dirt" inclusions), what we can see within the limits given above are:
- Defects in the "parent" phase ferrite: Grain boundaries (including twin boundaries), dislocations if they
are revealed by large (typically conical) etch pits, and the remains of not-too-small precipitates formed by dissolved dirt
if they are revealed by large (typically shallow) etch pits.
- Second phases like cementite or martensite.
- Inclusions that are large enough.
- Regions with a sufficiently high concentration of "something" (like phosphorous atoms), see below.
- Regions with a high density of small defects (like lots of little cementite particles close together) that cannot be
seen individually but produce a rough (and then dark) surface.
|
 |
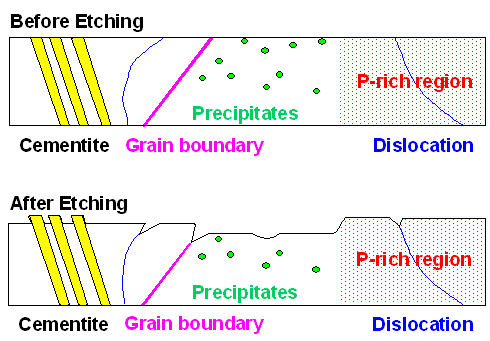
The picture below shows how some of this "works": |
| | |
|
|
|
 |
| What a structural etching does to a schematic piece of steel |
|
| | |
|
|
 |
We have used an "etchant" that dissolves ferrite, if ever so slowly,
but not cementite. As a first consequence, the cementite will now stick out. Moreover, the etchant dissolves regions with
a "high" phosphorous content considerably slower than those with little phosphorous, leading to raised plateaus
wherever you have sufficient phosphorous known as "ghost structure".
It also dissolves some (not all) grains faster than others, leading to steps along some (but not all) grain boundaries.
Finally, it dissolves regions where a defect ends considerably faster, leading to etch pits for dislocations and precipitates
and grooves for grain boundaries.
We produce structure by "differential
dissolution", by employing a dissolution rate that is different for different structures.
You can see
all of that in your light microscope. You only have to be a bit careful in interpreting what you see because grooves or
steps look about the same at high magnification.
Note that in the picture above I omitted martensite, slag inclusions
and "dark etching acicular
aggregates" nowadays called bainite, and whatever you might find in more complex steels, so it would not get too
complicated. |
 |
Now I need to answer your simple question: How does one "design" a proper
etchant? The answer is quite simple, too: Nobody really knows. To be sure, I and everybody else who knows something about
chemistry in general and the chemistry of iron and steel in particular, would have some idea of how to start but etchant
development is still mostly trial and error with a strong touch of "black art"; see also the module Sword
Polishing and Revealing the Pattern / Structure. |
|
 |
Nobody is perfect and that also applies to etchants. That's why we have a lot
of steel etchants, each one optimized for some specific purpose. |
| | |
|
| |
"Etchants" |
 |
First I need to narrow the subject: I'm only looking at rather standardized structural etchants here, reagents that reveal the structure
as outlined above. I am not considering "cosmetic" etchants that give your steel or blade a particular look. Here
is why: |
| |
|
| |
|
| | |
|
 |
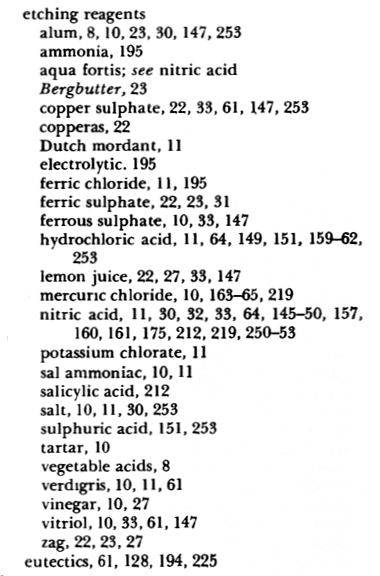
Smith lists 26 chemical, several with rather quaint names ("Bergbutter"?), that
appear on 64 or so pages of his book. They all are more or less intended to enhance or to bring out the structure of pattern
welded or wootz blades, to embellish harnesses, etc.
I certainly will not go into that and then run the risk that you
blame me because you messed up your wootz blade instead of enhancing its beauty by using one of those concotions.
So
let's get straight to the No. 1 of structural etchants: |
 |
Nital; short for "Nitric
acid (HNO3) and (ethyl) Alcohol C2H5OH. Methanol
(CH3OH) is also used. |
|
 |
Mix it in a ratio of acid : alcohol about 3 : 100 and you have Nital. I won't
give you precise information because I don't want you to do it if you don't know exactly what you are doing. Nitric acid
is dangerous and some mixtures of nitric acid with alcohol are explosive.
If mixed right, etching is quick, less than
a minute produces results. It works more or less as shown in the picture above and there are many examples of nital etched
steel in the hyperscript; e.g. here. |
 |
There are many kinds of steel and there are correspondingly many variations of
nital and etching conditions, The temperature, for example, does have some effect, too. |
|
 |
Nital has many brethren (concotions with alcohols and other acids like picric
acid (explosive!)) and they all work essentially as shown in the schematic picture above.
The following "etchants"
work on a different principle, though. |
 |
Color Etches: Oberhoffer’s etch, Stead’s etch, Klemm's etch and so on. |
| |
 |
The principle of structure delineation with those etches - sometimes called "color
etches" - is not so much the differential dissolution of the steel, but the deposition of
copper (Cu) on parts with a low concentration of phosphorous (or arsenic, or....?). The Cu protect the covered
areas to some extent from dissolution; the uncovered areas will the get attacked. Since copper has a definite color, the
etched surface appears colored. |
|
 |
You might ask why copper should deposit itself on an iron / steel surface? That
is not a good question. The good question is: Why does copper deposit itself only on
certain parts of iron / steel samples? Any metal A in solution will want to deposit itself on a solid metal B
surface if A is "nobler" than B. The degree of nobleness is well defined in chemistry. The more
you are asocial (no contact / bonding to all those people / atoms around you) and lazy (not doing much that is useful),
the nobler you are. Gold is nobler than silver, which is nobler than copper, which is nobler than lead,.... Way down on
the scale is iron, aluminum, silicon and carbon, the guys who do the work.
So copper should deposit itself everywhere
on an iron / steel surface. Yes, indeed, but copper deposition is not the only reaction that can occur if you throw you
iron / steel sample into in a more complex "etchant" that does not only contain dissolved copper salts but also
eye of newt and toe of frog, wool of bat and tongue
of dog or something else to this effect. Then several reactions might be possible besides copper deposition,
for example iron oxidation or dissolution. You then have a competition of the various processes, and which one wins will
depend on the local peculiarities of your sample, in particular if you add some hard-to-get scale of dragon, tooth of wolf,
witches' mummy, maw and gulf.
Here are two compositions of color etches: |
| | |
|
|
|
Oberhoffer's Etchant
100 cm³ water - H2O
100 cm³
alcohol (C2H5OH)
3 cm³ hydrochloric acid - HCl
0,2 g copper(II)-chloride (CuCl2
* 2 H2O)
3 g iron(III)-chloride (FeCl3 * 6 H2)
O 0,1 g tin(II)-chloride (SnCl2
* 2 H2O)
Room temperature
Duration about (1 - 3) minutes |
Stead's Etchant
10g copper(II)-chloride (CuCl2 * 2H2O)
40g magnesium chloride (MgCl2)
20ml hydrochloric acid (conc.) (HCl)
Alcohol to 1L (C2H5OH)
Room temperature
Duration for up to 3 hrs |
| Two recipes |
|
| | |
|
| |
 |
You get the idea. Etching is serious stuff that needs some experience not only
with the chemistry but also in the preparation of the specimens before your etch (perfect polishing is needed) and the interpretation
of what you see after the etch.
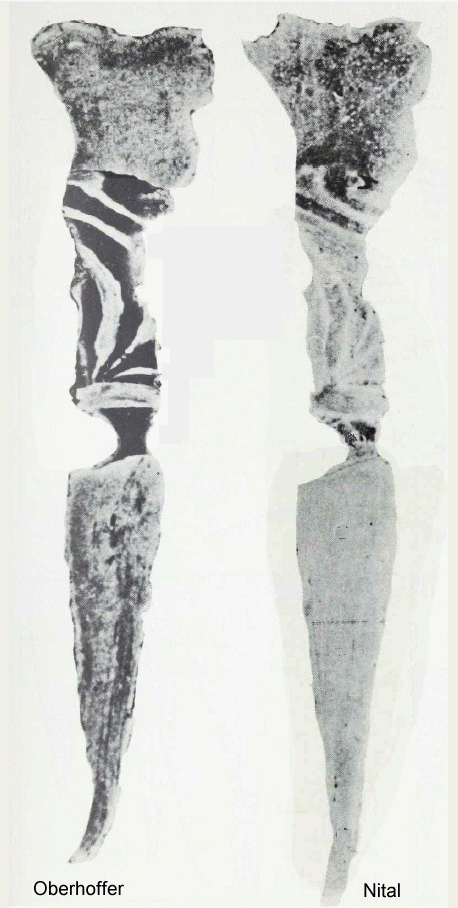
Here is a direct comparison of the two most prominent etches, Nital and Oberhoffer,
applied to the same specimen (probably front and backside of a thin cross-sections through a knife)): |
| | |
|
|
|
 |
| 13th century knife blade. Comparison of Nital and Oberhoffer etching |
Source: Pleiner (who else); "Die Technik des Schmiedehandwerks im 13. Jahrhundert
im Dorf und in der Stadt", in:
Geschichtswissenschaft und Archäologie Untersuchungen zur Siedlungs-, Wirtschafts-
und Kirchengeschichte Herausgegeben von Herbert Jankuhn und Reinhard Wenkus 1979. Band X X I I »Vorträge und Forschungen«,
herausgegeben vom Konstanzer Arbeitskreis für mittelalterliche Geschichte. |
|
| | |
|
|
 |
The color etchants (Oberhoffer, Stead, ...) selectively deposit copper on low phosphorus/arsenic areas, leaving the high phosphorus/arsenic areas appearing white.
The reason might be - my guess - that the oxide on the phosphorous-rich areas is just a little bit more stable than in the
other regions and that prevents Cu deposition.
The Oberhoffer etch does make the P-poor or rich areas better visible
than the Nital etch. Even in black-and-white. A picture with color can be found here.
Looking at higher magnfication would reveal more details (in particular for the Nital) but it is clear that revealing the
phosphorous distribution is best done with one of the "color etches. |
 |
This is black art, indeed. So in our modern times with fancy scanning electron
microscopes at our disposal (provided you can cough up at least half a million) we do not need to resort to those archaic
techniques any more. Not so. Proper "color etching" has two huge advantages to about anything else:
- It is dirt-cheap in comparison
- In the hand of a (typically female) expert, it is far more sensitive than X-ray techniques, i.e. it can detect phosphorous
at very low concentrations.
|
|
 |
There is also a big catch, however:
- The color etches cannot distinguish between phosphorous (P) and arsenic (As) and ?
No problem if you know you have only phosporous. That is certainly the standard case but arsenic keeps coming up here
and there and appears to be more important than thought some years ago. |
 |
Structure etching is here to stay. As long as we use it we run the risk of missing
something or interpreting something not quite correctly. One should be aware of this but there is simply no viable alternative |
| | |
|
© H. Föll (Iron, Steel and Swords script)


