|
| |
The Luristan Project - Results from Cut Sword; Part 1
|
Introduction |
 |
Sword No. 5 (2744) had been cut in two parts and will be referred to in what follows as "cut sword".
It could
easily provide enough material for a complete Ph.D. thesis. Unfortunately, not only were our project finances
and time
budgets limited, we also did not have the proper analytical tools (or sufficient experience) at our disposal to
do
an in-depth investigation. Nevertheless, in what follows you will find a lot of pictures and some comments. |
|
 |
The huge size of the "specimen" does not allow to use standard equipment like most
microscopes, electron
microscopes or various spectrometers. One either has to go for specialized equipment (that does
exist but is
not easily accessible without sufficient funds) or needs to cut the sample to size.
We did what we
could and then donated the cut sword (like the others) to the Royal Museum of History and Art in
Brussels, Belgium,
where Prof. Bruno Overlaet eventually can instigate a thorough investigation. |
|
 |
This module (and its successors) uses more and larger pictures than usual, so you might want
to enlarge the
browser window. An extra module linked to this one shows humongous-size
pictures. Why is that-? Simple:: |
| |
|
These modules constitute the
"official" project report
on the cut sword
| |
| |
| |
 |
The normal way to publish project results is to send a paper
to a suitable scientific journal. I have done that a
few hundred times so I know how it works. Why not here? Simple once more:
- No self-respecting scientific journal in the field of archaeology would ever except a paper from
a bloody amateur like me.
- No journal whatsoever would publish all those pictures and none could deal with the large sizes
needed to see details.
|
|
 |
What we 1) did was: |
|
 |
Taking some pictures of the "as cut" and "as etched in Bochum"
halves. Some examples of that are
already shown in the results overview. |
|
 |
While the "Bochum" half was left untouched, the other ("Kiel half")
was polished to a mirror finish. This needed to
be done by hand and took a lot of time and effort. Of course that wasn't done by me but by
Ingo Petri, an archaeologist with an extensive training in metallurgy. |
|
 |
The polished Kiel half-sword was then etched
with Nital. Microscope pictures were taking along defined
lines in several areas (see below). Nital etch delineates
the basic structure showing grains and in
particular cementite inclusions. |
|
 |
Subsequently the sword was repolished and etched with Oberhoffer etch. Pictures then were
taken along the same lines as before. |
 |
This was a lot of work. The results (see below) are remarkable but typically raise
questions that can only be
answered by an in-depth analysis employing more advanced methods.
At this point it is
necessary to recall that chemical etching, while a powerful and simple tool, always needs
interpretation by an "expert".
But even experts do not always know what they see. An expert does know what
a Nital etch reveals in an iron-carbon
steel as long as not much else is contained in the iron. With experience,
one might be able to interpret what a Nital
etch shows in common steels, containing some Mn, Si, etc. besides
carbon. What you get if sizeable quantities of the
rest of the periodic table are contained in the sample, is
not always clear, however. For the Oberhoffer etch these
uncertainties are even worse. |
|
 |
While we do have some experience with etching Fe / steel and interpreting the
results, we cannot claim
expert status. The interpretations given below thus must be taken with a grain of salt. To make it plain: |
| |
|
Interpretations here are tentative.
They might be wrong.
| |
| |
| |
The "Bochum Striations" and First Conclusions |
 |
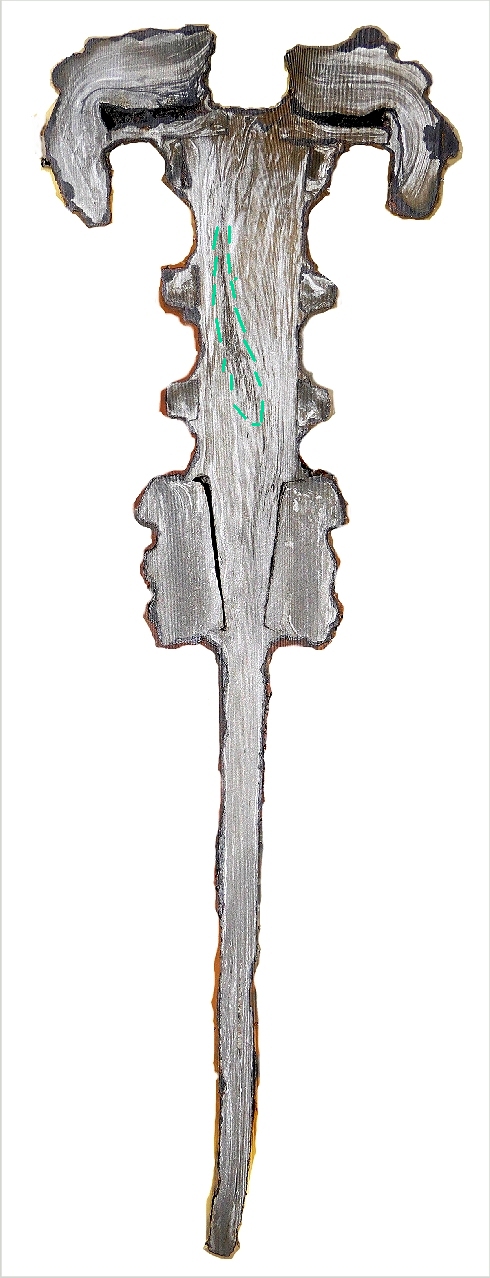
As pointed out in the results overview,
the half-sword etched by the team of Prof. Ü. Yalcin
in Bochum, Germany, showed well-developed striations on a macroscopic (0.1 mm - 1 mm) scale. Looking at this
surface
with a microscope does not produce additional information since the roughness of the as-cut surface
overwhelms all
finer features. It is thus of interest to see if this structure could also be found in the polished
and etched half of the sword. |
| |
 |
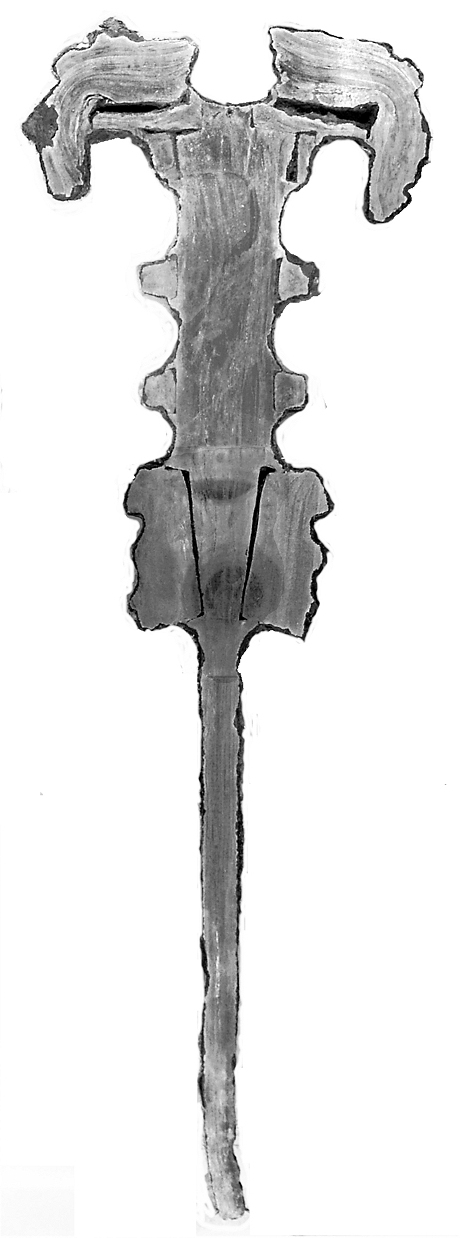
The answer is: yes - but! While the Oberhoffer etch essentially produced a rather
similar
striation pattern (see below), the Nital etch only showed it faint striations in particular in
the two
heads as demonstrated by the pictures below. |
| | | |
| | |
 |
 |
| Bochum half; Nital etched in as-cut condition |
Kiel half; polished and Oberhoffer etched.
Strongly contrast enhanced. Note mirror symmetry to Bochum
half
The polished surface also shows (by reflection) the camera and its surroundings. | |
| |
| |
| |
|
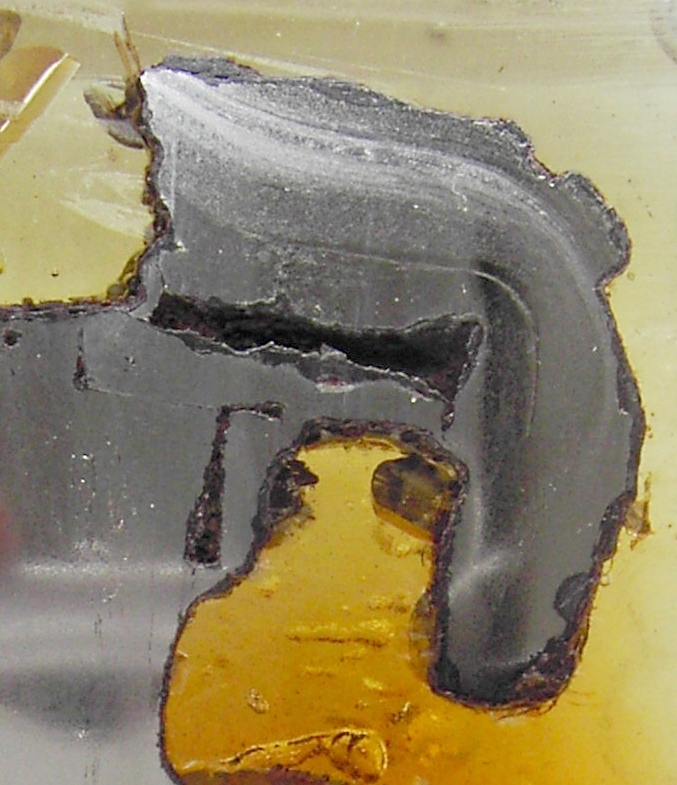 |
Part of Kiel half; polished and Nital etched.
Strongly contrast enhanced. |
|
| |
| |
|
 |
In producing these pictures a problem is encountered that needs to be mentioned here. Before
etching the surface has
been polished to a mirror-like appearance. After the etching we still have a mirror-like surface.
Now imagine you want to
take a picture of the surface of your bathroom mirror. Just pointing a camera and shooting
will produce a (mirror-image)
picture of you and your camera. Same thing here. Some features in the images are due
to reflections and that obscures
to some extent the structures we want to see. |
 |
Anyway, we may draw some first (tentative) conclusions:
- The "Bochum striations" are real. They delineate some structural feature of the iron / steel of the sword.
- These striations must relate to the forging process. Not only the body of the sword but also the "heads" and
"animals" originally must have consisted of iron pieces with parallel striations (later bend by forging in the
case of the heads). A layered structure is likely and that points strongly to some kind of piling of the starting
material. If that was done by repeated stretching and folding (i.e. faggoting)
or by lamination of individual
layers cannot be determined so far.
- The striations might be due to impurities since they are particularly prominent in the Oberhoffer etch. This etch typically
delineated phosphorous (P) but also Arsenic (As) and God knows what else. This implies that the impurities were either
introduced
during the welding or, if contained in the starting material, that they took on a layered structure during
forging by a process known as
"banding" that is prominent at the forging of wootz blades.
- If the "white lines" delineate welded surfaces, we must conclude that the welding process most of the time
was
rather perfect - but sometimes catastrophically imperfect. The huge "cracks" filled with some extraneous
matter (fayalite crystals?)
as shown below and here attest to that.
- The striations continue from the wide handle part to the narrow blade. They are just "squeezed together" as
the material
become thinner in the transition region between handle and blade. That is a strong indication that the
smith made the core of
the sword (handle and blade) from one piece of material, "pulling out" the blade part
from the (layered) bulk of the starting material. |
| | |
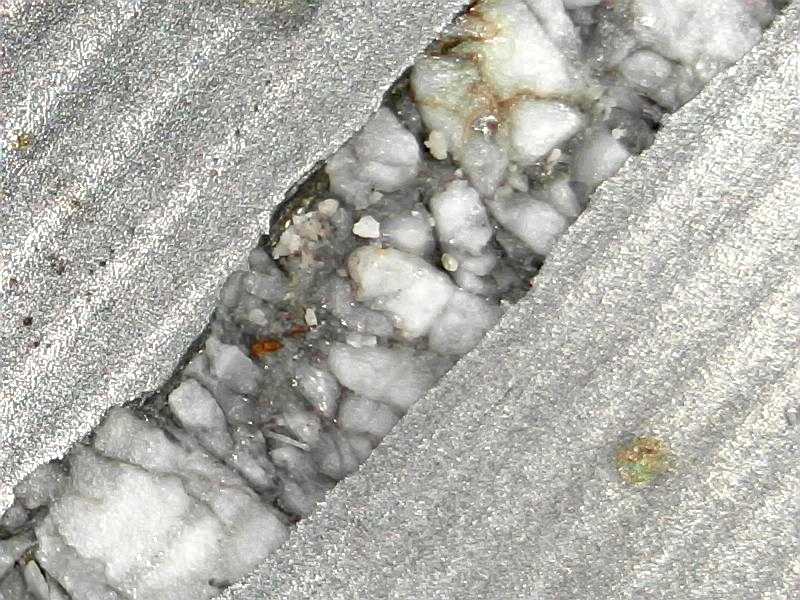 |
Huge cavity in the blade filled with crystals (fayalite?) seen in the as-cut state.
The parallel white "lines" here are not the striations discussed here but reflect some small waviness from cutting. |
|
| |
| |
| |
 |
It remains to be seen if the detailed analysis of the etched areas support the above conclusions |
| |
| |
|
|
 |
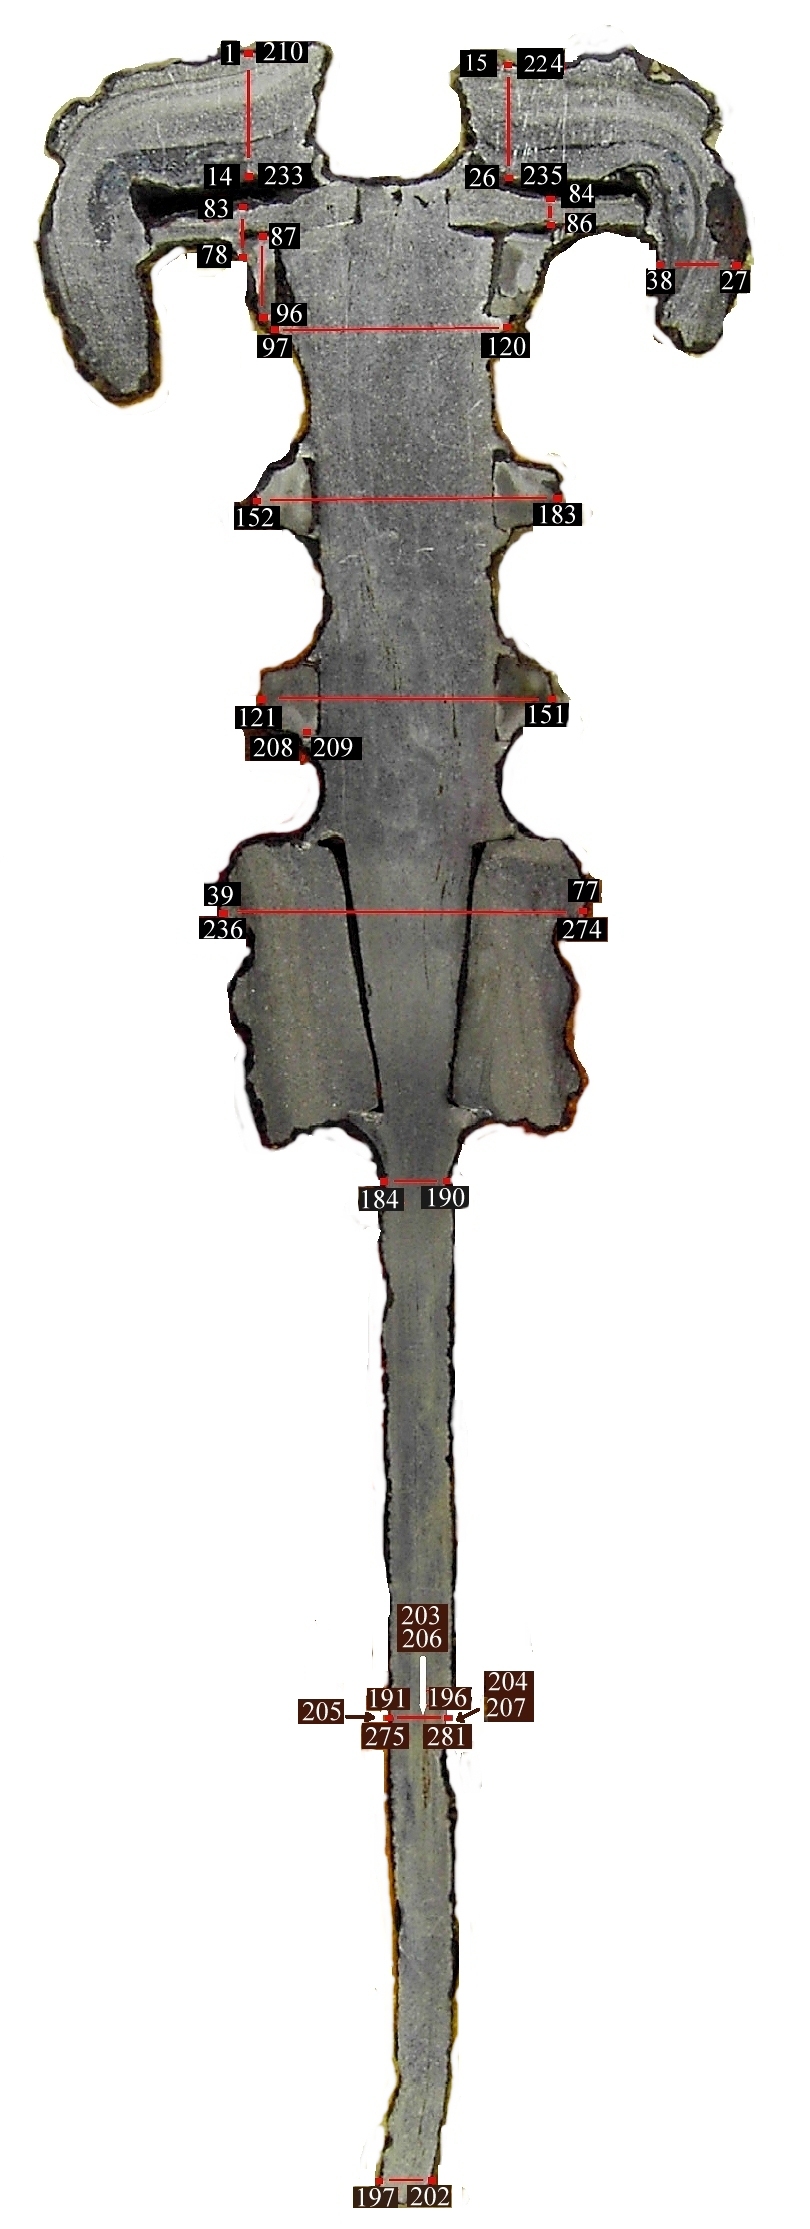
Let's start with the Nital scan through the left head;
number 1 - 14 for the Nital etch; No. 210 - 233
for the Oberhoffer etch.. Below are small (!) scale pictures of the
total scans after Nital and Oberhoffer etching.
Some full scale pictures of scans can be accessed via links to the
large picture files given in the margins. |
| | |
|
| |
 |
 |
| Scan through the animal part of the left head. Nital etch. The full
size picture (x 5) can be found din this link. |
Scan through the animal part of the left head. Oberhoffer etch.
No large scale picture |
|
| |
| |
 |
A first few obvious observations are:
- The Nital etch reveals areas with rather different structures (like grain size) that have rather sharp boundaries.
- The elongated slag (?) inclusions are often close to suspected welding boundaries but not directly on it (see below).
- Details of grains (see below) make certain that the carbon content varies quite a bit and that (possibly)
precipitates
of something else are present.
- The length : width ratio of large elongated slag inclusions is at least 10 : 1. This strongly hints at considerable
"drawing out" by forging, producing, e.g., a (100 x 10 x 1) mm3 sheet from a cube with 10 mm linear dimension
- The Oberhoffrer etch shows rich structures hinting at the presence of phosphorous (and possibly other
impurities) in varying concentrations.
- The "macroscopic" contrast variation of the Oberhoffer etch picture is compatible with the macroscopic striations.
A clear interpretation. however, is not possible at present. |
| |
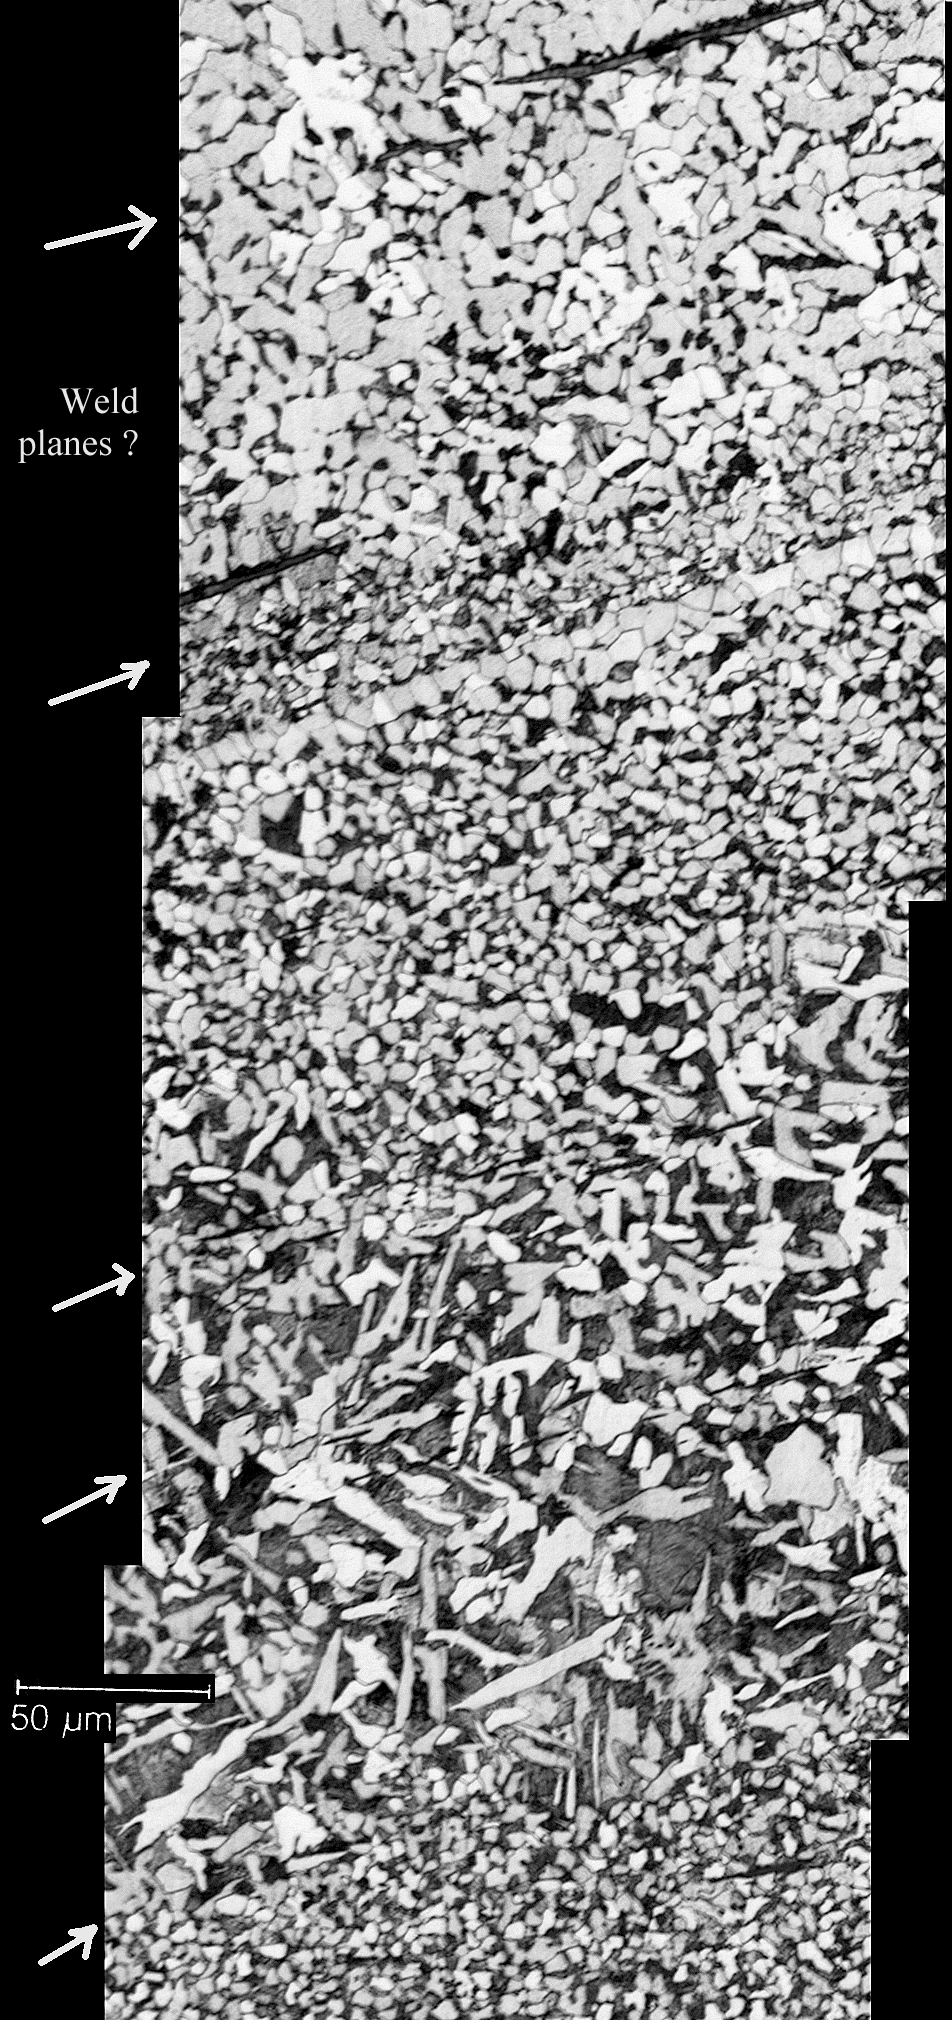 |
Upper part of the scan through the animal part of the left head. Possible welding planes
(more or less perpendicular to the screen) are indicated.
Note the sharp but featureless transitions between regions
of different grain size and structure,
and the presence of elongated slag inclusions nearby in some cases. |
|
| |
| |
 |
A first conclusion is possible: |
| | |
The material of the head consists of a
layered structure.
The various layers have different
properties / compositions
| |
| |
| |
| |
 |
In other words: The first tentative conclusions based on
the macroscopic appearance of the cut,
are fully supported by the microscopic study of one of the "heads".
It remains to be seen if the other
scans bear out this finding. |
 |
Here are the two "Nital" scans from the second head
(right-hand side). I omit the Oberhoffer scan since
it does not lent itself to easy interpretation once more. |
| |
|
 |
 |
Left: Main scan through right head.
Top: Scan through the "beard" region of right head.
Note the difference in scale.
Everything stated before applies here just as well. The sharp
transitions between regions of different grain structures
are
evident and so are the elongated slag inclusions running parallel
to the transition regions. It is also evident
that the material
consists mostly of iron with a low carbon concentration.
That is, however, not typical for other
parts of the sword as we shall see. | |
Large scan version | |
| |
| |
 |
It is hard to conceive how these structures could have been produced without fire-welding
some layers together.
But shouldn't one expect in this case that the elongated slag inclusion should sit right in the
weld boundary?
The answer is two-pronged |
|
 |
Yes - you would expect elongated (slag) inclusion if you
stretch your material after fire-welding (e.g while
faggoting; shown here).
Fold over, introducing some (oxide) particles into the welding plane. Stretch and thus elongate the particles,
then
fold over (introducing new particles), then stretch again (elongating some more), etc. In the finished stacked
you find
elongated inclusions right in the boundary. |
|
 |
No - you would not expect elongated (slag) inclusions
in the weld boundary if you first
draw out sheets from pieces of the bloom, thereby elongating the slag inclusions
contained in the bloom, and then
fire-weld a stack of those sheets. You would then find elongated lag inclusions somewhere
in the welded structure
and weld seams containing at best small particles that are not elongated. If the smith cleaned
the sheets
before welding and knew what he was doing, you might find rather perfect welding planes in a material
otherwise full of (elongated) large slag inclusions.
Something like this: |
| |
| |
| |
|
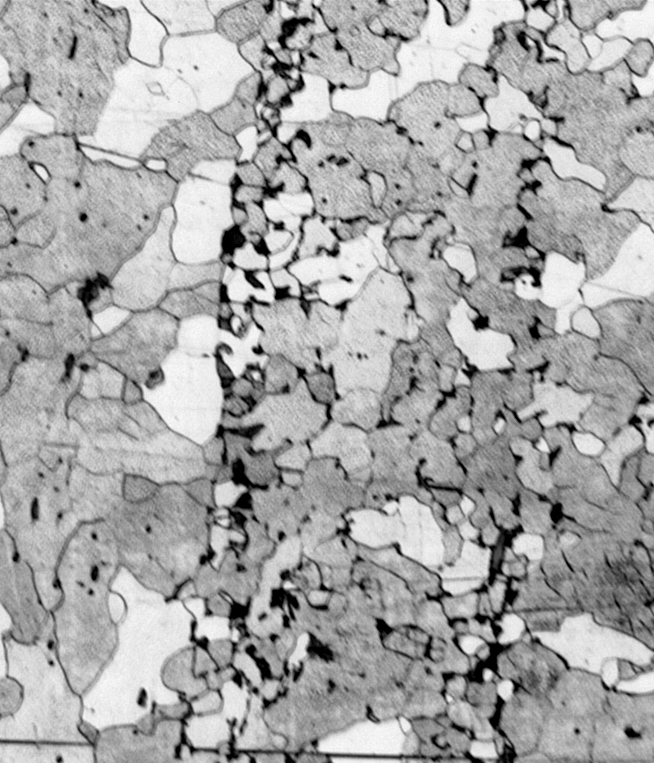 |
Magnified section of the right head picture from above (turned 900).
The black
shapes are probably particles introduced during weldning. Some of them might also be pearlite "nests", however. |
|
| |
| |
 |
All things considered, we might safely assume that the old Luristan smiths worked
with rather imperfect blooms, containing
quantities of slag and other non-iron objects. They forged thin plates out
of the stuff and fire-welded them to the best of their ability.
They may not yet have discovered the art of purifying
the bloom parts and thus could not rid the material of the larger slag inclusions.
Alternatively, maybe they didn't
care because some "dirty" sheets didn't matter much if you payed attention to what
you were doing otherwise. I'll get to that. |
|
|
|
| |
 |
In order not to overload this module, I will continue in two separate modules. Here are the links |
| | |
Part 2 Pommel and hilt
Part 3 Animals and blade
Part 4 Discussion of the results
Large Pictures |
| | |
|
© H. Föll (Iron, Steel and Swords script)


