|
11.6.3 Making a Japanese Sword - Part 2 |
| |
Forging the Blade |
 |
You're a Japanese sword smith around 1500 or so. In contrast to your European
counterpart, you are not seen as an undistinguished dirty craftsman but as an accomplished expert and artist, sort of. You
were on level three of the social ladder (level 1 were the samurai, level 2 the peasants) but one above the merchants and
bankers! Ain't that nice? Of course, your local daimyo or overlord would chop your head of in less time than it takes to
say f*** if you just looked at him the wrong way. He used that extremely sharp sword you made for him for doing that. But
as long as the head stayed on life was good. As far as it went.
Now you are in the process of forging a new sword.
You had already made three blocks of well-faggoted high, medium and low carbon steel and now you would use these blocks
to produce a new katana with superior quality. |
|
 |
First you need to make a decision. How are you going to pile
the ingredients for your blade? The softer steels inside, the hard one outside, of course, but there are many ways you can
do that - if you are a Japanese smith or believe in Japanese mythology, that is. |
| | |
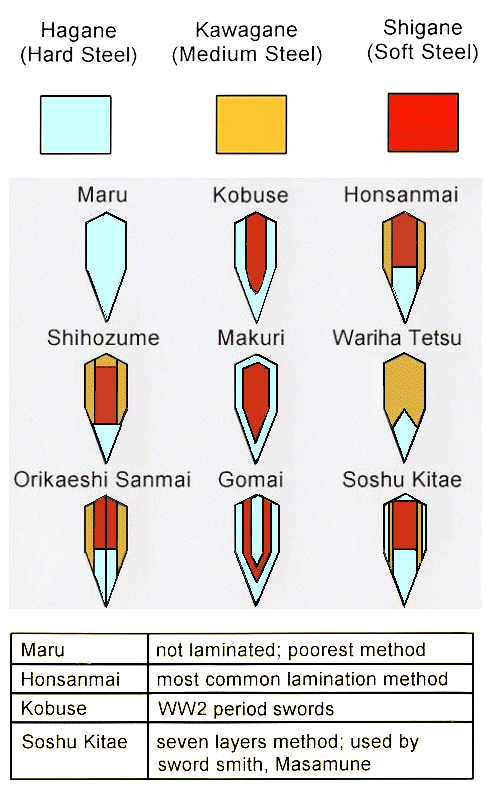 |
Various ways of making a Japanese sword blade by piling
three grades of steel according to Japanes sources |
| Source: Basic drawings of this are all over the Net |
|
| |
 |
Masamune (c.1264–1343),
the most accomplished smith of Japan, supposedly made the most complex sword blade, soshu kitae. Of course. Maybe he did;
I just couldn't find any proof of this claim. Not to mention that I would find it hard to believe that the complex "Soshu
Kitae" way of piling offers any advantage relative to the less involved ones. Asking if the "orikaeshi sanmei"
kind of piling is better than the "soshu kitae" or "gomai" is like asking if a Renoir painting is better
than one from Cezanne or Monet.
To some extent we are back to the myth. "The vast majority
of historical blades were kobuse construction (soft core, hard jacket), followed distantly by san mai (hard edge, soft spine,
medium jacket), followed very distantly by maru (solid). Other construction methods are relatively rare and were the result
of experimentation, various pseudo-scientific theories (there was no deep scientific understanding of metallurgy after all),
traditionalism, etc. Some of them are arguably apocryphal, like Soshu-kitae" writes an unidentified but obviously
knowledgeable source in an Internet forum. |
 |
I won't challenge you now to make a "Soshu Kitae". You (and I) do not
really know how to do that and as far guessing goes, you can do that yourself. Let's make a kobuse instead. No European
smith around 1300 or even 1000 plus years earlier would have had a problem doing that. |
| |
 |
So first bang your steel "bricks" into roughly sword blade shape. Two
from hard steel and one from soft / medium. Then laminate a somewhat wider piece of hard steel between two pieces of softer
one.
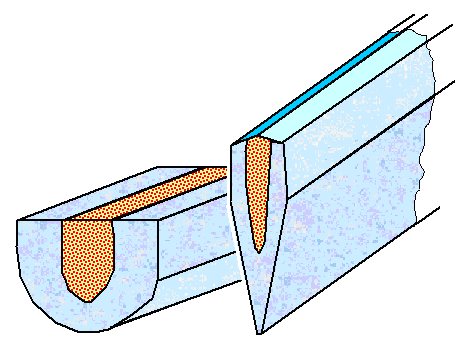
Yes, that would work but the Japanese did it in a slightly different way. They first forged one piece of "brick"
tamahagane into a "V" shape and then inserted the softer steel into the gap. Then you fire weld the package and
hammer it out into the desired shape of the blade. Well - not quite. You actually curve the blade a little less than desired
since the quenching produces additional curvature.
Before you quench, you must semi-finish the blade by filing and grinding
since you can't remove much material after quenching. What you do is "case-hardening"; only the outer layers will be affected and if you file them off later you got a problem
|
| '' |
|
 |
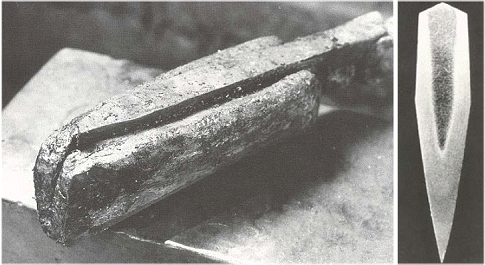 |
Forging a kobuse style Japanese sword
Top: The basic idea
Bottom: the real
thing |
| Source: Michael Morimoto, Colorado School of Mines. "The Forging of a Japanese
Katana", June 14 th , 2004 |
|
| |
Quenching the Blade |
 |
Rapidly cooling steel with at least 0.3 % of carbon or so produces very hard and
brittle martensite instead of medium hard pearlite plus soft ferrite. Read
it up! Quenching a 1% carbon or so tamahagane steel easily brings you in the 800
Vicker's hardness region. Turning the whole tamahagene of your kobuse style blade to that kind of hardness plus the
concomitant brittleness would not be so good, however. You only want the edge to be ultra-hard, compromising for the unavoidable
brittleness, but the rest should not be brittle. |
|
 |
It is clear what you need to do. Just quench - rapidly cool - the edge part and
allow the rest to cool down more slowly. Given the cross-sectional shape of your blade that will happen automatically to
some extent. Thicker parts unavoidably cool more slowly then thinner parts, just as the outside cools down more quickly
then the inside. There is a what is called a hardness depth,
after all.
Plunging your hot blade into cold water thus will never turn the inside hard and brittle but quite possibly
more of the outside than what you have in mind. You need to do something. What you do for your steel is exactly what you
do for yourself when you don't want to cool down too quickly getting out from your warm house into a very cold winter day.
You wear protective clothing that acts as a barrier or thermal insulator, decreasing the heat flow from your warm body to
the cold air. |
 |
You do exactly the same for your blade. You protect the areas not supposed to
cool down too fast with a thermal insulator. Goose down or coyote fur, however, will not do in this case since that stuff
cannot take the heat. Ceramics are better, in particular because you can easily coat your blade with some pasty clay stuff
that fires into a ceramic as soon as you heat up your blade. You are doing some special kind of of pottery.
You even can influence the local cooling rates by varying the thickness of you protective clay layer. The thicker the layer
the slower the cooling. What you are doing now is known as differential cooling. |
|
 |
It is of course not quite as easy as it sounds. Your clay paste must have the
right properties, like sticking well to the blade, firing well, and so on. Then you must not only heat your blade well above
the A1 transition temperature of 727 oC
(1341 oF), the blade needs to have the same temperature everywhere. That calls for a rather large
and well-tended hearth plus experience to substitute for the lack of thermometers.
Then you may encounter a little
paradox: Those parts of your blade that are coated with just a thin layer of clay will cool even faster than the bare blade!
That's like wearing metal clothing - you get cold faster than with no cloths at all! Why? Well, when you stick something
very hot into cold water, the water will start to boil right at the hot surface. Air bubbles are produced. Air bubbles are
terrific thermal insulators, preventing rapid cooling. On a clay surface the bubbling is different than on a metal surface
and less air bubbles may speed up the cooling.
The composition, size and temperature of your quenching bath is also of some importance. It is not quite as important as the smiths of old believed but of some importance nonetheless.
So quenching was a tricky process that might have been left to a specialist. In return it offered a number of good
points:
- The edge can be made ultra hard. It will also be brittle but its "attachment" to a ductile body allows you
to live with that.
- The edge can be made ultra sharp and it retains its sharpness as long as you don't
hit objects harder than itself.
- Other parts (e.g. the back) can be much softer, allowing to absorb impacts from other swords more easily.
- The quenching process induces some additional bending of the blade, making its shape more "perfect".
- "Painting" on the clay paste with a certain shape of the transition region between thin (fast cooling) and
thick (slow cooling) areas produces a hamon with a certain shape or pattern that provides for beauty and a kind of type-signature
on your blade.
- The quenching process leaves residual stress and strain in the blade. This can make the edge stronger for cutting.
The first three points are sufficiently clear by now. The others need some explanation. Let's first look at point
4 in some detail; point 5 will emerge from this. |
 |
So why should quenching induce some additional bending of the blade? That is a
tricky question. There are several reasons for this that all work together. Understanding the basic processes is easy, understanding
the details is rather difficult.
In order to grasp what is happening, imagine a small cube somewhere inside your hot
blade, ready to be quenched. It contains a number of iron atoms arranged in the face-centered
cubic (fcc) austenite lattice and some carbon atoms according to what kind of carbon concentration you have at the point
you have chosen. Now let that little cube cool down to room temperature and watch what happens to it, always keeping the
same number of atoms inside. There are two basic phenomena that will try to change its size
- As it gets colder the cube will want to shrink in size. That is just the opposite of the well-known thermal expansion, the observation that all materials expand
when they get hotter. When they get colder they contract.
- As the blade gets colder we have a phase change, the atom
arrangement inside the cube will change. For regular iron there is the switch-over from the fcc austenite where the iron
atoms are most closely packed, to the more loosely packed bcc ferrite. That means that the cube must now expand somewhat.
If you have carbon in in there too, you also get some cementite now but that does not change the basic picture: the cube
expands
We have two unavoidable effects that will tend to change the dimensions of your blade - and they oppose each other.
That is a nuisance but also a great thing! We have used that already
to our advantage for experimentally establishing phase diagrams by a method called dilatometry |
|
 |
But now we must look at complications induced by quenching a katana blade. There
are essentially four:
- The phase transitions occurring in a quenched katana will also produce martensite besides ferrite and pearlite. While
that also calls for a volume change, it is different from that of the other phase changes. It also happens later, at lower
temperatures.
- If the volume changes in different parts of the blade are different at a given time as in the case above, the blade
will now be under stress and must deform. If, for example, the edge regions wants to expand more than the back region, the
blade must bend into the katana-shape direction.
- Volume changes will also be different if the temperature is different in different parts. While the edge area is already
cold and thus wants to contract quite a bit, the back is still hot and wants to contract less. Thermal
stress develops and the blade then is forced to bend into a more concave "yatagan" shape.
- The total stress at any given point and time is the sum of the thermal stress and the phase change stress. It can become
rather large in certain places at certain times. If it exceeds certain local limits, plastic deformation or fracture will occur.
|
|
|
Note that many of this complications do not apply to double-edged blades with
a symmetrical cross-section. The cold outside of the front part will also tend to bend the blade relative to the still hot
inside. But the backside, just as cold as the front side, wants to do the same amount of bending - but in the opposite direction.
The stress introduced by both cold surfaces cancel each other and no bending will be observed. It's not quite that simple
but definitely far simpler.
I have discussed this before
in some detail and I gave you the long science module. If you read it or not - by now it should be clear that what is going
on inside the blade during quenching, in terms of stress, strain and deformation, causing the blade to bend, deform or even
shatter, is rather complex and not given to simple back-of-the envelope calculations. You need to use the front of a largish
envelope and a big computer. | |
|
 |
That's what Tatsuo Inoue
did and here are some results: |
|
|
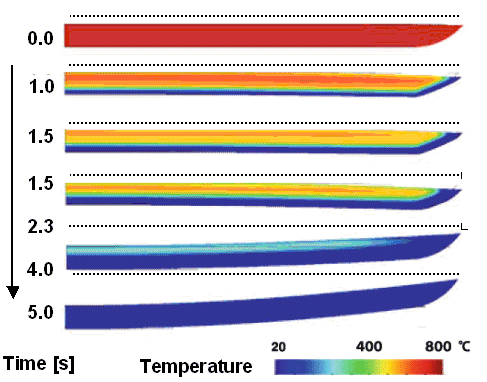 |
Shape and temperature development of an initially straight
katana during quenching |
| Source: Inoue |
|
| |
 |
Starting form a straight blade the curvature first is concave before it turns
around for the final convex shape. Why that happens is rather clear in principle. Of course, the details depend on many
things: what kind of clay, how thick exactly, the kind of quenching fluid, the volume of the fluid (a large volume will
no heat up as fast as a small one) , and so on.
I'm also not sure if Inoue took into account that the soft core might
undergo plastic deformation, a process hat changes the stress distribution. I would even guess that a soft core is necessary
to avoid fracture during quenching. I have reasoned about this in detail here,
so I won't repeat myself. |
 |
Quite a lot is going one during quenching a katana (or any other single edged
blade). We understand it now but for the old smiths this must have been pure magic. If all went well you got a very hard
edge formed by rather pure martensite, followed by a transition region from martensite via bainite to pearlite. The transition
region could be made visible quite well by proper polishing, meaning
" special Japanese polishing" in this case. Your blade now showed a hamon: |
|
|
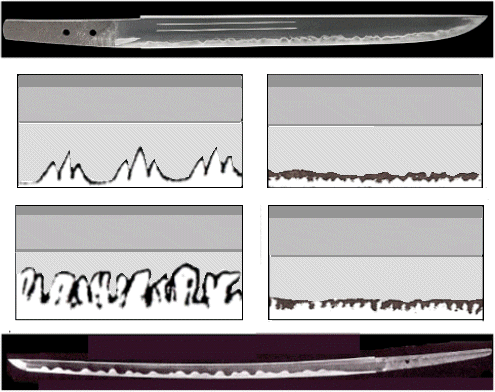 |
| Examples of real hamons and four drawings (out of 27) used to classify hamons |
| Source: Commercial sword selling sites; all over the Net |
|
|
 |
Is the wavy type of hamon better than the more straight one? That's like asking:
is red better than green? So let's not go deeper into this. A hamon adds beauty and complexity to a blade, what exactly
that means is in the eye of the beholder. There are undoubtedly persons out there who could tell off-hand what kinds of
hamons are shown above, for what kind of period and smith they are typical, and so on. It's a great thing to be able to
do this eiterh professionally or as a hobby. It's just not materials science but rather something like art history. |
 |
Is the differential quenching procedure a typical and unique feature of Japanese
swords? Do other swords have a hamon? Is the alleged superiority of the Japanese sword embodied in the hamon? |
|
 |
As far as wootz swords are concerned the answers are clear. They are not quench
hardened because they are already very hard throughout and the heating before quenching would destroy their unique structure.
They cannot have a hamon, not to mention that a hamon would destroy the beauty of this blade type. If a Japanese sword is
superior to a wootz blade is open to doubt, however. |
|
 |
As far as European blades are concerned, the situation is not
so easy. Nobody has seen a hamon on surviving old European swords but that doesn't prove that there isn't one. The blade
simply may not have been polished or otherwise conditioned to show its hamon.
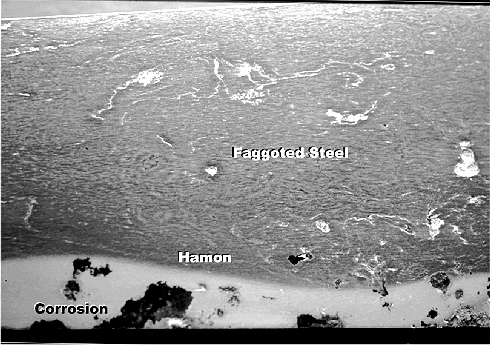
So let's do a Japanese polish on an old
European sax blade. Here is what you get: |
| |
|
|
 |
That's just another picture of the sax shown in the faggoting
module. We can also be pretty sure that some Roman swords would have shown a hamon, given their cross-sectional
structure with hardness values. The same is true for some Moravian
swords.
The major ingredients for producing an European variant of the Japanese sword - faggoting, piling and quenching
- were well known in Europe already during Celtic and Roman times. We have, however, almost no metallurgical data for whole
blades and not too many for cross-sections. If clay coating before quenching was known and used is thus simply not clear
at present. In any case, we can be pretty sure that some European swords were just as good as their Japanese counterparts
for the same time period and much better in earlier times. |
 |
It remains to consider point 6 from the list
above: the quenching process leaves residual stress and strain in the blade. That is easy to see given the "bending" picture. Whatever is going on inside the blade during quenching, in the end it wants to
bend into a convex shape. That results mostly from the need of the martensite of the edge to expand a bit more than the
rest. To do so necessitates to squeeze the back but the relatively small volume of the martensite edges will only be able
to compress the voluminous back to some extent and not as much as needed. That means that the martensite is not as relaxed
as it wants to be but still somewhat compressed:. |
| | |
The edge of a Japanese sword is
under compressive stress
|
|
| |
 |
Is that good or bad? Good question. Consider a spring that you can pull out or
compress a certain length before it breaks. Now put some mechanical "'bias" on it, for example a fixed weight.
The spring will expand somewhat and is now under tensile stress relative to its unbiased state. What that means is that
you now need less force or stress to extent it to the length were it will break but
more to compress it to the crucial size. If you bias the spring into compression, it
is the other way around.
The edge of the katana is under compression, meaning it takes more force to increase the curvature
of the sword (=making the edge longer) relative to a stress-free edge to the breaking point. The same for the back, just
with the signs reversed. In a bending test in the right direction your katana now appears stiffer. If you hit something
hard, the curvature will also increase. Your katana with the built-in stress will then bend less than it would in a stress-free
state. That might be good.
However, the forces acting on your edge in a real sword fight are not exactly parallel to
the edge, trying to make it longer. It is far more complicated than that. After all, when something hits your edge it will
tend to compress the material at and near the point of impact and stretch the material farther away. If the edge is already
under compression, it takes less "bang" now to compress it to the critical value where something will give. That
is bad. |
|
 |
So, all things considered, is the internal stress in Japanese swords (and others)
good or bad on average? I have a clear answer to that: I don't know! |
| | |
© H. Föll (Iron, Steel and Swords script)


