| |
10.1.4 Smelting Copper - The Second |
| |
Let's Smelt! |
 |
I am now going to demonstrate the working of a "large-scale" copper
smelter to you. That is the kind of apparatus that allowed to start the "bronze-age" around 3 500 BC, about 1500
years after the first small-scale smelting of copper. From today's point of view, those smelters are pitifully small affairs.
However, compared to what was around before, they were complex and large "machines" that also needed a certain
infrastructure for successful operation.
It also doesn't matter at this level of generalization what you smelt. Here
we look at copper, but doing iron would also be possible, not to mention lead and tin.
The first thing we need is a
"container" that, well, contains the fuel, ore and flux in the top part of the smelter, and the product in the
bottom part. It also - most important - must contain the heat produced by the energy
source in the bottom-near region. |
|
 |
That you must somehow mechanically contain
the ore, charcoal, and copper produced is a bit trivial at first sight. I promise that it will stop to be trivial when you
look at it a bit more closely.
That you must contain the heat is also trivial. If you don't, it just won't get hot
enough where it's needed. Your heating apparatus in your room will not be able to sustain the temperature in the room if
you open all windows and make sure that there is a draft. |
|
 |
So let's make a shaft
furnace, a tube with an inner diameter of roughly 30 cm, and up to a meter tall. We make
it from a material that can take the heat and that has a low heat conductivity, so heat doesn't leak through the walls.
Mud or clay, perhaps re-enforced with some straw, might do the trick. |
 |
Our furnace tube must not contain the gases
blown through it or produced during smelting. They must be allowed to leave through the top or "flue".
Since our construction is open on the top, gases can not only leave there, we can also use that opening to replenish fuel,
ore and flux from time to time.
The bottom part is set somewhat into the earth, after we lined the very bottom with
some suitable stones as shown here: |
|
|
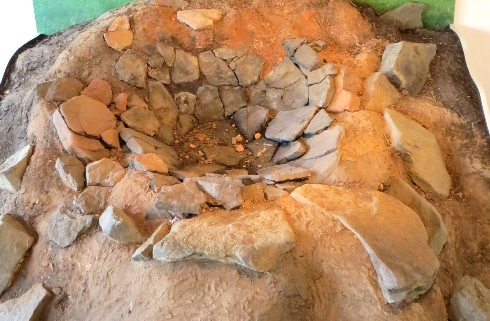 | | Bottom part of a shaft furnace |
| Source: Photographed in the Goslar museum |
|
 |
Now we need a few more openings. Definitely one for running the
air in that is needed to keep a fire going. Through that opening we stick a pipe, called a "tuyere",
through which we will blow in the air, somehow.
Maybe we add another hole lower down for tapping liquid slag every
once in a while. The whole contraption (without a slag tapping hole) now looks schematically like this: |
| |
|
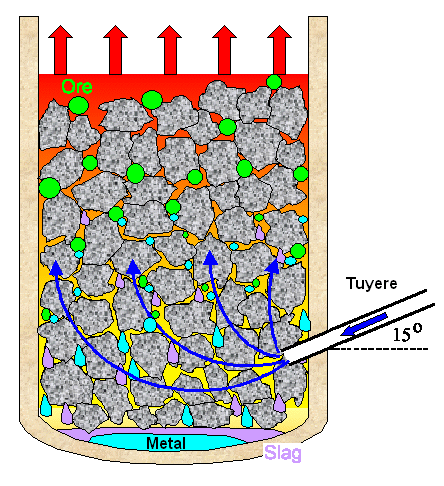 | | Schematics of a real smelter |
|
|
 |
A first construction problem becomes obvious. Everything would be
far easier and more elegant if the solids (charcoals, ore, flux, ...) would sit
on a grate, with the air flowing uniformly through the load which we will now call
by its proper name: "burden".
Sorry. Can't be done. There was (and
more or less is) no material that can take the heat and the weight of the burden for very long. We have no choice. We need
to blow in the air with a tuyere from the side as shown. In doing this we must make sure that: |
| |
- It is the right amount of air (always a lot), and
- It flows out of the business end of the tuyere with the right speed that makes it
go nicely through the whole diameter of the furnace as shown. If it comes in too slowly, it will not reach the other side.
Too fast and it will leave a "dead" pocket above and below the tuyere.
The diameter of the tuyere is essential here. It is easier to move a lot of air into the furnace if the diameter is
large - but then the air will flow slowly. The two demands are contradictory, and in order to meet them the (inner) diameter
of the tuyere must be just right for the kind of pressure
you can apply to your blowing apparatus. | |
|
 |
Even with the right tuyere diameter it is not so easy to meet the two easy-to-state
requirements above. It is actually very difficult as we shall see. Read up the science module if you want to know why this is so right now. Otherwise we just assume that we somehow can do it right.
Now
we fill our smelter with charcoals only, and start the initial fire. |
|
 |
No, No
NO!! You don't use your barbecue charcoals! That's one
of the many reasons why your smelting didn't work. You need to use a carefully
adjusted mix of high-energy charcoals produced
from special hardwood trees, and highly reactive charcoals made from soft wood. For best results the charcoal should have
been made from branches and not from the trunk of the tree, and at rather high temperatures. In other words: you use special
and expensive charcoal.
Not to forget: You pay a lot of attention on making sure that your charcoal lumps have all about
the same size, and that must be the right size. You need to meet two contradicting requirements
once more:
- The surface-to-volume ratio of your charcoal bed should be large since the energy
production (the "burning") takes place at the surface. That calls for a small lump size. Not too small though,
otherwise too many surface regions touch and cancel each other.
- The air resistance of your charcoal bed should be just right and not too
large. Air resistance measures how hard it is to blow air through your burden. For very fine lump sizes (essentially a powder),
air resistance is very large and blowing air through a bed of powder would take a very high pressure. You might just blow
your burden right out of your furnace in this case. Making the lump size large, or using just a pile of wood, makes it easy
to move air trough the pile but now your energy production goes down, and a lot of the oxygen in the air isn't even used
for burning but passes just through, preventing carbon monoxide production.
Your lumps size needs to be just right. As a rule of
thumb, start with a size of about about 10 % of your inner furnace diameter and then optimize. |
 |
Now set the charcoals on fire from below, establish proper air supply, and keep
it going until your furnace is "at temperature". It will take a while because during this period you heat up and
"fire" the clay walls of your furnace, too.
You will observe that only the first five or so layers of charcoal
are really burning, with a temperature of (1200 - 1300) oC
((2192 - 2372) oF). Actually, you will not observe that because there is no way to look inside a
working smelter. You infer that from indirect observations.
Why is that? Why shouldn't the whole stack be on fire? Because
the oxygen needed for burning comes from below, and at optimal conditions there is no more oxygen left after the air traveled
through the first few layers of your charcoal bed. Instead of the normal oxygen - nitrogen mix that constitutes air, you
have now a carbon-dioxide - nitrogen mix a few layers above the burning charcoals.
That is good - it enables smelting!
The charcoals above the ones burning and thus taking out the oxygen from the air
are quite hot, of course, since they are close to a very hot fire and exposed to very hot gases streaming through. Those
gases are the carbon-dioxide (CO2) formed by the burning reaction that also produced all the energy, and the
nitrogen of the air that does not do anything except getting hot. If you provide enough of that energy (by reacting the
right charcoals having the right size with the right amount of air) the charcoals above
the burning layer should acquire a temperature of at least around 800 oC (1472) oF); more is better.
That will allow the reaction of the carbon in the charcoals with carbon dioxide from below, producing deadly carbon monoxide
(CO) according to:
CO2 + C Û2 CO.
This reaction actually consumes
energy and thus cools things to some extent. So if you want the reduction zone
to be around 1000 oC, the oxidation zone, where the burning
takes place, must be considerably hotter.
The carbon monoxide produced will move up the stack with the nitrogen and
the carbon dioxide that might have been left over. |
|
 |
After a while of burning just charcoals, your smelter is ready for use. You can
check that by hanging over it. If you are dead quite quickly, the carbon monoxide production is taking place satisfactorily.
A better way is to watch how fast your charcoal moves down. Charcoal disappears almost completely by either turning into
CO2 or CO, and the whole burden therefore moves down the shaft at a certain rate or speed. As soon as this consumption
rate looks right, you start to add ore and flux to the charcoal you feed to your smelter. |
 |
Now we can finally start to do a bit of smelting! And it goes without saying that
you better take care to: - have the right ore or mix of ores.
- The right average size of your ore pieces.
- The right kind of flux or mixes of fluxes,
- with right sizes.
- And in particular the right amounts of charcoal, ore and flux!
This link gives an idea of how that was done not so long ago in the case of iron smelting.
|
 |
As your burden moves down, a given layer in the burden will get hotter and hotter
while it is exposed to the carbon monoxide and nitrogen streaming up. The nitrogen still doesn't do a thing except heating
the burden and funneling out energy. There is nothing you can do about that.
The carbon monoxide, however, will start
to react with your ore, reducing it, and it does so typically already at low to medium temperatures already present high
up in your furnace. The product of the reaction is the metal, and typically carbon dioxide once more. Possibly some more
stuff is produced, depending on what kind of ore you use, either escaping as gas or adding to slag production. That will
turn out to be a serious problem; I'll ge to that.
In either case, you now need to fully understand an often overlooked
but serious fact of smelting: |
|
|
Metal production by reduction is
always a solid state process!
|
|
|
 |
In a way that is clear. You can't melt a metal before
you have it.
Very schematically what is going on looks like this: |
| |
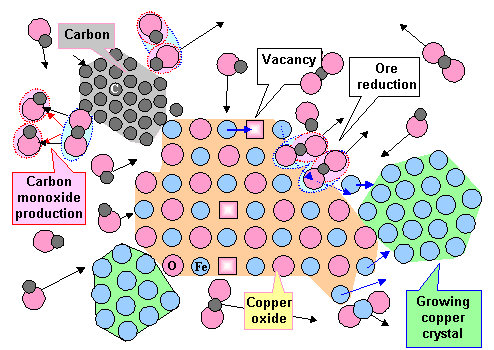 |
| CO production and ore reduction in an atomistic model |
|
| |
This is what happens on an atomistic level. Hot carbon (upper left) reacts with
one molecule of carbon dioxide (CO2; blue ellipse) to form two molecules
of carbon monoxide (CO; pink ellipse) The CO takes out the oxygen atoms from the surface of the metal oxide (center right).
This leaves surface vacancies behind. The left-behind metal atoms roam along the surface until the find a metal crystal
into which they become incorporated. Alternatively they start to form a new one. The arrows just indicate that all the gas
molecules run around with a very high speed that defines the temperature.
Your gangue plus the added fluxes also start
to react, forming glassy stuff that is, however, neither fully formed nor liquid at the medium temperatures where reduction
is already happening. This is not shown above since my artistic talents are limited. |
 |
Once more: Reduction starts early and turns the ore into the metal plus, depending
on what kind of ore you use, something else that either escapes as gas or participates in slag making. Nothing is liquid
while that happens. Eventually, the process is finished. The newly smelted tiny metal particles move down with everyhing
else, getting hotter, but for a while they are still in the carbon-monoxide rich area we call reduction
zone, together with charcoals not yet consumed and the slag that meanwhile also has formed from the gangue and the
flux added to the burden.
But after a while you run into a big a problem. You must get your metal now through the very
hot and oxygen containing zone (the oxidizing zone) where the charcoal burns, all the
way to the bottom. You must do that without oxidizing your metal again! |
| |
 |
If you ever watched a smith putting a piece of iron in the really hot part of
the fire on his hearth, you saw that his solid piece of iron oxidizes very quickly. Your solid small copper or iron particles
don't stand a chance! They will never make it through the oxidation zone if the go down there in a leisurely pace. They
will get completely reoxidized! You must move them through rapidly, and that is best
done if they are liquid! Liquids can move much faster down the bed of charcoals than
solids that must move with the charcoals. Liquids just trickle through.
The problem of course is that we do not necessarily
have our metals liquid. The melting point for copper may not yet have been reached at the edge of the oxidation zone, and
for iron it will never be reached. Iron stays solid all the time. So nothing helps but enclosing the metal particles in
liquid
slag
Liquid slag can easily take small solid particles along when it trickles
down. And it not only transports them fast through the dangerous oxidation zone, it also protects them from oxidation since
it coats the particles.
If a liquid metal trickles down by itself, it will become partially oxidized but some metal
might make it. The metal oxides formed will end up in the slag.
I'm talking efficiency
here. How much of the copper contained in the ore ends up as the elemental copper you are after, how much ends up in the
slag as copper ore? It is not difficult to have a very high percentage for the latter. You fill in a lot of ore and charcoal
but you get just a little bit of metal; see the picture below. |
 |
Now you have one very good reason why slag is good for you - if its the right kind, and so on. There are more very good reasons why you want to produce slag - read about them here or just believe me!
All I wanted to do here is
to demonstrate one thing. Smelting adheres strictly to the Goldilocks
principle: |
|
|
Smelting is a complex process!
A lot of things need to be JUST RIGHT!
|
|
|
 |
A lot can go wrong. If you don't start with everything being just
about right, there is very little you can do after you set your smelter on fire.
Nowadays we understand most
everything and can model what is going on inside a smelter on a large computer. But a few details are still not all that
clear. The reason is that it is impossible to "look" inside a running smelter, watching what is going on. |
 |
Next let's look quickly at the key problem of smelting: the air supply! |
| |
|
| |
The Overbearing Importance of Air Supply |
 |
Very simple calculations or quickly gained experience will teach you that you
need a lot of air to run your smelter from above. How are you going to supply that air.
Let's quickly go through the options: |
 |
1. Blowpipe
The picture shows the use of blowpipes around 2 400 BC in Egypt. The other half of that picture is here.
You supply air to your smelter by exhaling into a blowpipe that leads right into the furnace or crucible. |
| |
 | | Use of blowpipes around 2.400 BC |
|
|
 |
Blowpipes are laughably inefficient. It takes six guys in that picture to keep
a tiny little crucible at temperature! There is no way to run the smelter above with blowpipes. There would not be enough
space for assembling the necessary throng of guys around your smelter. And no, you can't just make the blowpipes longer;
they loose efficiency with length. |
 |
While smelting probably did start with with blowpipes, you didn't get very far
this way and it went out of custom. It took only a few thousand years for the guys to figure out something more effective.
That's right! Smelting in the very beginning, before it became more common place around 3 500 BC, was done with blowpipes
or with one of the methods coming next. It was still used after 3 500 BC as the picture proves. However, blowpipes still
would have been your instruments if you just wanted to melt small amounts of a precious
metal like gold in the privacy of your home. Maybe that's what those old Egyptians were doing. I'll get back to that further
down but first I like to introduce a somewhat better if still not-so-good method for supplying air. |
 |
2. Natural Draft and
Wind
Potters could (and still can) heat a large kiln to very high temperatures
by burning wood in an mostly enclosed fire box
connected to the "hot box". The whole contraption was constructed in such a way that it produced sufficient
natural draft (via the chimney effect) to keep
a lively fire going.
That kind of construction culminated in the "reverberatory
furnace" that even allowed to melt iron in the 19th century. |
|
 |
Fine - but we are talking 6 000 BC or so here. Those guys might have mastered kinky sex by then, but they couldn't even get close to a reverberatory furnace or
an advanced kiln.
Nevertheless, more simple "natural draft" furnaces might have been used. Unfortunately,
not much remains after 8000 years or so, and what one finds often does not allow an unambiguous identification. Here is
an example.
Some natural draft furnaces for smelting iron have
been used in Africa in more modern times, so it can work - provided you do everything exactly right, of course. |
|
 |
That is also true for the next kind: Wind-blown furnaces.
Besides doing everything just right, you now must also have the right wind from the right direction. Wind-blown furnaces
have been used at least in Sri Lanka around 500 BC for
smelting iron, so you can do it.
What we can reasonably assume for neolithic times is that natural draft and wind-blown
furnaces were used and that they were an improvement compared to blowing into a salad-bowl sized crucible with your blowpipe.
Natural draft and wind furnaces might have been instrumental for starting larger-scale copper smelting arond 3500 BC. They
are still rather inefficient and messy, though. |
 |
Both types - natural draft and wind - have one huge advantage: if it works, it
is very simple and cheap. You save the costs for food and whips, needed to keep your slaves going, and so on.
However,
they also produce a major problem: |
|
|
Natural draft and wind furnaces
can't be controlled!
|
|
|
 |
The only major control you have while running a smelter is the air supply! You can blow into
your blowpipe vigorously or sluggishly. You can move its business end from here to there. You can get a second guy to help
blowing. You have some control!
With simple natural draft / wind furnaces you must take it as it comes.
Not so good. If we want to do some serious
large-scale smelting now, we need to invent... |
 |
3. Bellows
Bellows
were the major invention for getting serious smelting going. We call everything "bellows" that turns mechanical
energy into a stream of air, not just the accordion type you're visualizing right now. Your bicycle pump qualifies as bellows,
for example. Here is a picture: |
| |
|
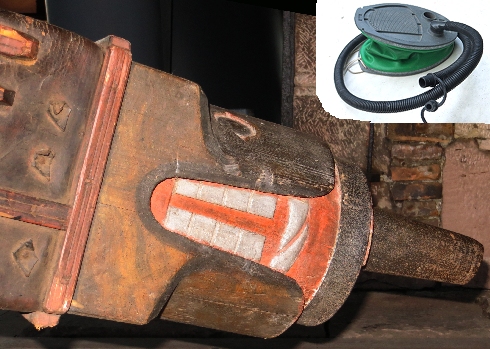
|
Business end of the big bellows shown here plus a
piece of modern junk for blowing up air mattresses |
|
| |
 |
Why bellows are of the utmost importance for smelting is simple to see. One well-trained guy
working a well-designed bellows replaces at least 40 if not 80 guys with blowpipes! Your muscle power is just that much
larger than your breathing power.
Attach one decent bellows to the tuyere of our smelter from
above and you are in business. Of course, the diameter and length of your tuyere must be just right, not to mention
the "angle of attack" (the 15 o shown are about right), and you should have no leaks in your set-up.
It is really simple: no bellows - no large-scale smelting. American cultures never invented bellows and they had no large-scale
smelting of copper either. Moreover, they never got around to smelting iron. More about the topic can be found here. |
 |
Bellows offered one more big advantage: you can also work them with powerful machines
like water wheels or windmills, increasing power relative to an human another 50 or 100 fold. Besides the Chinese, however, nobody did that before the Middle Ages, even so the infrastructure
was in place. The Romans, for example, did use waterwheels extensively for other jobs.
The reason for not using large
water-powered bellows and matching large smelters was simple. It made no sense to smelt iron in very large "bloomeries"
since you couldn't handle massive blooms, the solid iron produced in there. How would
you get it out, for example, without destroying your smelter? That would be an insurmountable problem even today. But bloomeries
went out of style around AD 1500, in exchange for blast furnaces that made liquid cast iron. Doing that you can go for large-size smelters since your product is easily
removed by tapping it. A blast furnace, by the way, is exactly the same thing as your old bloomery, except that it is bigger
and you blast a lot of air inside continuously by mechanical means. |
|
 |
Who was the genius who invented bellows, one the most
important pieces of hardware needed for the progress of civilization? When and where?
I don't know, neither does anybody else. The Hittites certainly knew bellows around
1700 BC since they brought that technology to Egypt when they invaded it. It is likely, however, that bellows are considerably
older than that. It is tempting to identify their invention with the start of "industrial-size" copper smelting
around 2 500 BC, somewhere in Mesopotamia, Asia Minor or the Balkan. |
| | |
|
| |
Primitive Smelting |
 |
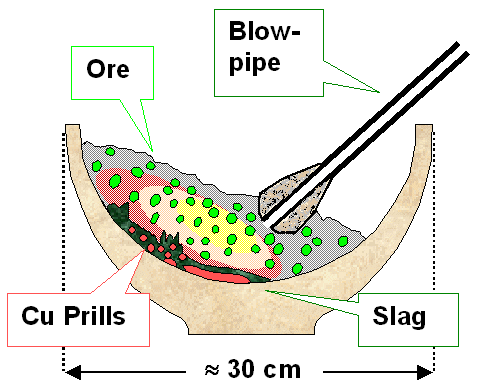
It remains to do a bit of primitive, inefficient and messy smelting, like much
of humankind before around 3 500 BC. The most primitive smelting you can do in your living room, using a salad-bowl size
crucible. In fact, your ceramic salad bowl might be good enough for the job.
The picture tells it all:. |
| |
 | | Schematics of a working salad bowl smelter |
|
| |
 |
Heap up some charcoal, more on the side opposite to your blowpipe. Ignite it, put your blowpipe
into it, blow. Add some ore, stir maybe, blow here, blow there, and with luck you will produce a mix of a little slag and
a few prills of copper, wherever you happened to keep an area hot enough for a little while and produce some carbon monoxide.
It appears that something like that was done for millennia in some towns, here and there. Interestingly, those towns were
not close to the places where copper ore was found or even mined. The ore obviously was "imported" to the places
where smelting was done, maybe just as much for its "greenstone" quality in the beginning as for smelting a bit
of copper on occasion.
Here are two real crucibles. Note the hole in the base, where you could insert a stick for handling. |
| |
|
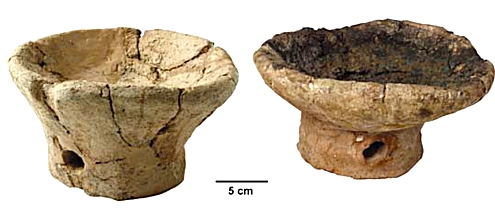
| Unused (left) and used (right) crucibles from the early
fourth millennium BC; Ghabristan; Iran 1) |
| Source. Courtesy T. Stöllner and G, Steffens, Deutsches Bergbau-Museum, Bochum,
Germany |
|
| |
 |
Tin smelting, on the other hand, appears
to have taken place close to the mines, for example in Göltepe (not to be confused
with Kültepe), a large bronze-age town thriving from about 3300
BC to 1800 BC in what is now Turkey. Remains of crucible smelting have been found, but also enormous deposits of slag, indicating
that the smelting method must have been more advanced than what is shown in the picture above. |
|
 |
Now I can dispense with (simple) melting in just a few
sentences. Do more or less the same thing as in simple crucible smelting. Use a smaller bowl / crucible because you must
be able to pick it up when it is very hot so you can pour the metal out. Only put charcoal and copper in there. Blow directly
on the surface because you do not need to make carbon monoxide. Look up a few more details here. |
 |
Just for being complete, there is yet another way of smelting. Take a crucible
formed more like a beer glass than a salad bowl. Fill it with powdered charcoal and
ore plus some magic ingredients (powdered flux in other words). Immerse it in a bed of burning charcoals or into a very
hot kiln. In other words: heat it from the outside. If everything is done right, you might get the so-called direct carbothermic reaction inside the crucible, reducing the ore first with solid carbon
and not with carbon monoxide. This is rather inefficient because the reaction can only take place at the points where the
carbon touches the ore and not all over the surface as with carbon monoxide. |
|
 |
However, if your were lucky and had the right ore for (iron) smelting, the carbothermic reaction
produces its own carbon monoxide according to, if you must know:
2 Fe2O3 + 5 C Þ 4 Fe + CO2 + 4 CO.
The process thus was self-amplifying. It allowed to reduce ore in a furnace or kiln with an oxidizing
atmosphere; you didn't need to produce reducing conditions. This kind of crucible smelting might also have worked for copper
- I don't know.
More about that in this
link. |
 |
Of course, in a space as large as Europe plus parts of Asia,
and during a time span of a few thousand years, all kinds of smelting variants must have occurred. The technology slowly
improved from extremely simple and inefficient "salad bowl" smelting, via highly organized blow-pipe smelting
(like the guys above) and natural draft / wind furnaces to bellows driven
"large-scale" operations. Zillions of variants must have been used, and the archeological records tend to show
this. Here is a rather illuminating statistic from two places of what is now Jordan: |
| |
 |
Percentage of copper found in slag as a function of time.
Different color=different general areas |
| Source: Redrawn from Haupmann's
book |
|
|
 |
Note the concentration scale - it's logarithmic! Duringn the very early times
of smelting, up to 100 % of the copper ended up in the slag. The "pink" area (actually the Timna area in Jordan,
close to the gulf of Elat) was doing better than the "light blue" area (Faynan, also in Jordan, further North)
with only around 5 % Cu lost. As time progresses, efficiencies get better. Around Roman times Faynan was doing better than
Timna, and losses were below 1 %
It took several 1000 years to get there! |
 |
Still, nothing helps, without bellows plus getting everything about the furnace
and its burden "just right", copper smelting could not take off and become the large-scale operation that used
copper alloys and started what we call the "early bronze age". |
| |
 |
Maybe you noticed that I'm inching away from copper smelting towards iron smelting? And that
right now it looks that there is hardly any difference between copper and iron smelting.
Be patient, please. We are
almost there. We only need to look at alloying copper
first, so we can make proper (tin) bronze and what is referred to as "arsenic" copper. |
| | |
|
© H. Föll (Iron, Steel and Swords script)


